发布于 2014-10-24 01:56:37 | 453 次阅读 | 评论: 0 | 来源: 网友投递
这里有新鲜出炉的Swift教程,程序狗速度看过来!
Swift编程语言
SWIFT,苹果于2014年WWDC(苹果开发者大会)发布的新开发语言,可与Objective-C*共同运行于Mac OS和iOS平台,用于搭建基于苹果平台的应用程序。
本文为大家讲解的是如何在iOS 8下使用Swift设计一个自定义的输入法,为大家介绍了有关键盘扩展相关技术,然后通过使用iOS 8中的新应用扩展API的设计一个摩斯码的输入法,感兴趣的同学参考下。
概览
通过使用自定义输入法替换系统输入法,用户可以实现一些特别的功能。例如一个特别新颖的输入方式,或输入iOS原生并不支持的语言。自定义输入法的基本功能很简单:通过点击、手势,或者其他输入事件,然后通过一个未分类的 NSString 对象在当前文本输入对象的文本插入点插入文字。
当用户选择了某个输入法后,当应用打开时,它将会变为默认的输入法。因此,任意输入法都应该允许用户切换到另一个输入法。
对于每一个自定义输入法,有两个很重要的点:
1、信任: 你的自定义输入法能够让你访问用户输入的所有内容,因此你和你的用户之间的信任非常重要。
2、一个“下一个输入法”选项: 兼容能够让用户切换至另一个输入法必须成为每个自定义输入法界面的一部分。你必须在你的界面中中提供。
自定义输入法所不能实现的
有一些输入对象是自定义输入法不能被使用的情况:安全字段(例如密码),电话号码对象(就像联系人应用中的号码字段)。
你的自定义输入法不能访问输入框的视图层级,它也不能控制光标和选择文本。
同样,自定义输入法不能在顶行之外显示任何内容(就像系统键盘当你在后面的行上长按一个键时)。
沙盒
默认情况下,自定义输入法并没有网络访问,也不能和容纳它的应用共享文件。如果想实现这些功能,必须在Info.plist文件中将RequestOpenAccess布尔值至YES。做了这个之后,会扩展自定义输入法的沙盒,就像在建立和维护用户信任提到的那样。
如果你确实需要申请访问权限,你的输入法将获得以下权限,每一个都会有相应的责任:
- 访问位置服务和地址本数据库,每一个都需在第一次访问时获得授权。
- 可选择与容纳该输入法的应用的共享容器,使得在应用中可以定制词汇表。
- 能够将输入的字符和其他输入事件上传至服务器进行处理。
- 访问iCloud,例如,能够确保输入法的设置以及你的自动修正词汇能够在所有用户设备上同步。
- 通过包含还输入法的应用,能够访问Game Center和应用内购买。
- 能够和受控应用进行协同,如果你使用来设计该键盘以支持移动设备管理(MDM)
顶层设计
接下来的图形展示了在运行的输入法下有哪些重要的元素,同时展示了在一个典型的开发流程中,他们的位置。在大部分情况下,我们通过一个应用来容纳这个输入法扩展,一个UIInputViewController来控制这个键盘并针对用户事件给予反馈。
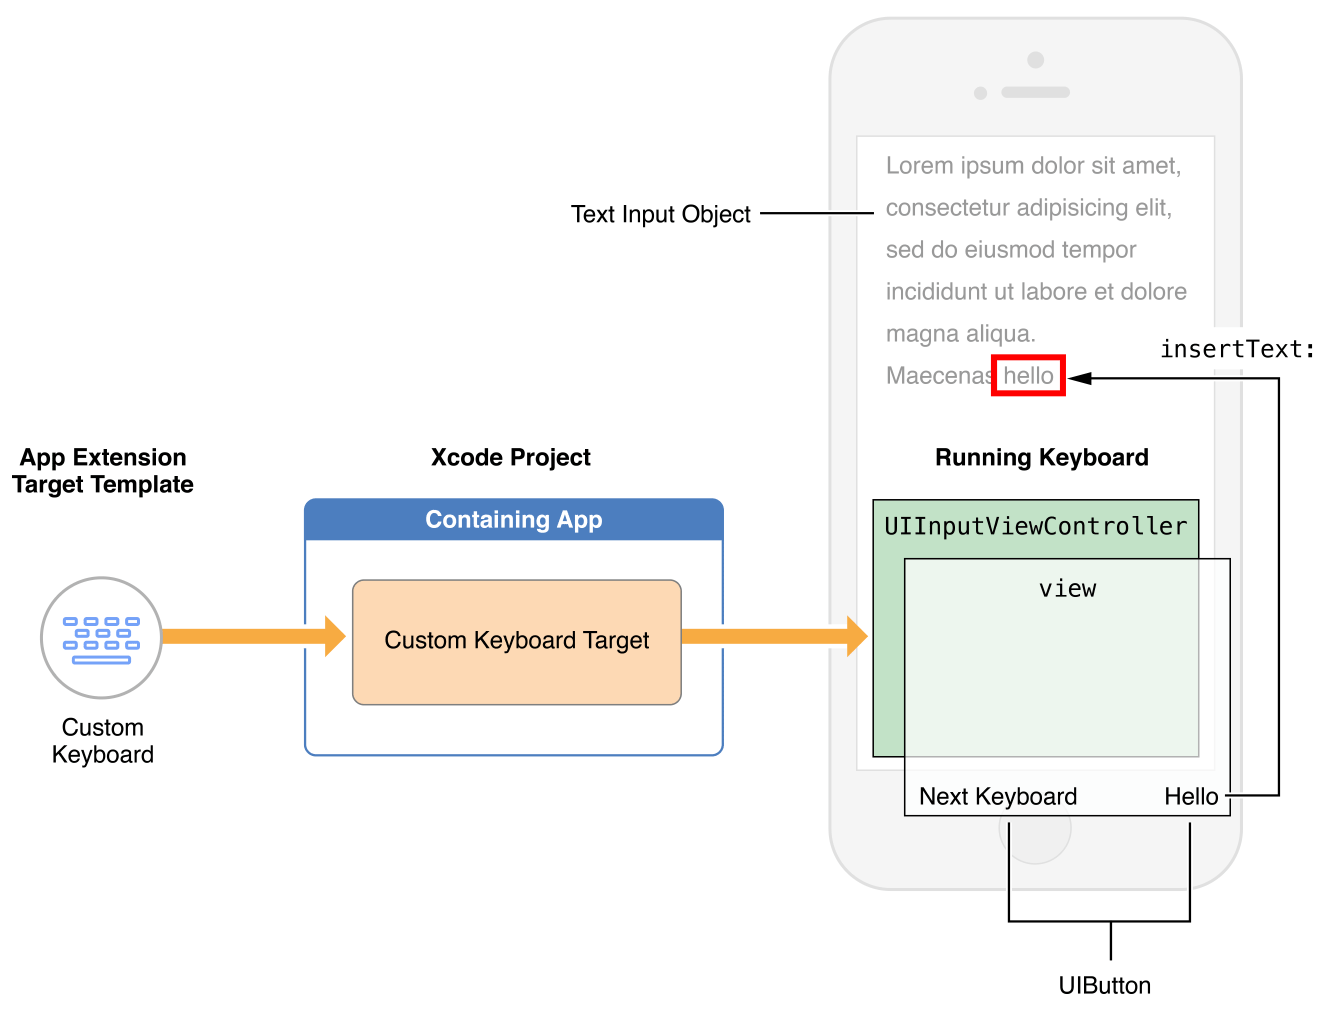
自定义的输入法模板包含一个UIInputViewController的子类,这个就是你的输入法的主要视图控制器。让我们看一下这个接口来熟悉一下是如何实现的:
class UIInputViewController : UIViewController, UITextInputDelegate, NSObjectProtocol {
var inputView: UIInputView!
var textDocumentProxy: NSObject! { get }
func dismissKeyboard()
func advanceToNextInputMode()
// This will not provide a complete repository of a language's vocabulary.
// It is solely intended to supplement existing lexicons.
func requestSupplementaryLexiconWithCompletion(completionHandler: ((UILexicon!) -> Void)!)
}
- UIInputViewController支持UITextInputDelegate协议,当文本区或者文本选项区变化时,通过selectionWillChange,selectionDidChange,textWillChange和textDidChange事件来实现。
设计一个摩斯码输入法
我们会设计实现一个简单的输入法,可以输入 点 和 划,改变了键盘结构,删除字符然后隐藏自己。这个范例通过代码来生成的用户界面。当然,我们同样也可以使用Nib文件来生成界面-这个会在教程的末尾涉及。加载Nib文件会对性能有负面影响。
创建一个工程
打开Xcode6 ,创建一个“Single Page Application”,然后选择Swift为编程语言。
添加一个文本区域
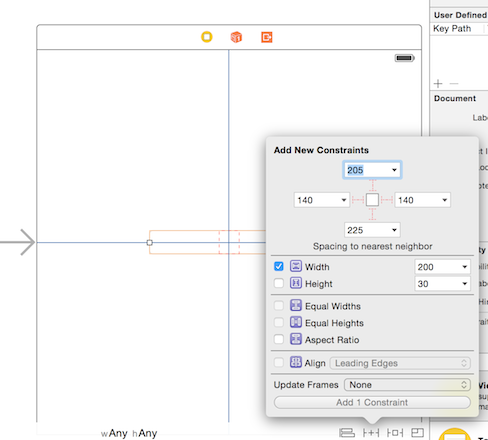
打开Main.storyboard然后拖拽一个文本区域从组件库里。我们会使用这个来测试我们设计的键盘。
将这个文本区域居中,然后添加必要的contraints。
Hint: 如果你调用textField.becomeFirstResponder()在viewDidLoad,这个键盘会自动在应用打开时弹出。
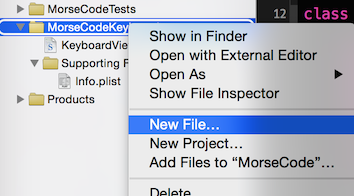
添加这个键盘扩展
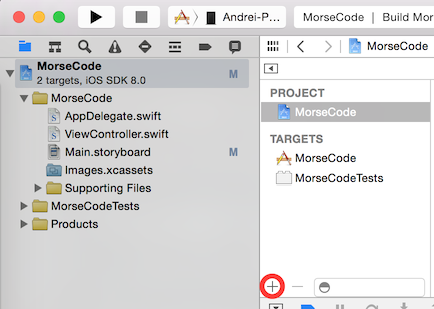
从导航器中选择这个项目文件,然后通过按+按钮添加一个新的target。
选择Application Extension然后使用Custom Keyboard模板,命名它为MorseCodeKeyboard。
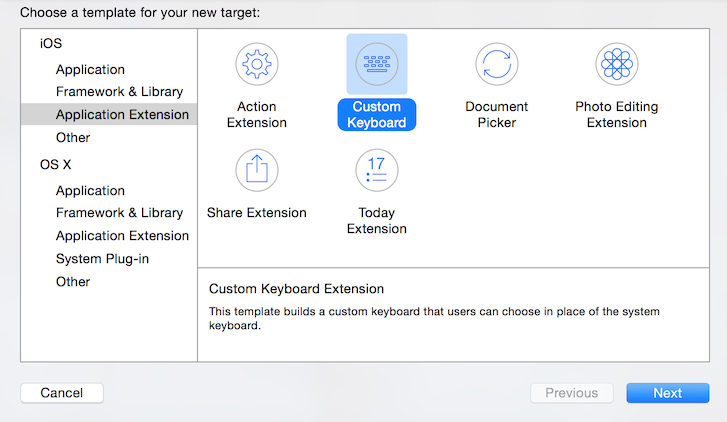
这会创建一个名为MorseCodeKeyboard新文件夹,包括2个文件KeyboardViewController.swift和Info.Plist。
接下来
打开KeyboardViewController.swift,为了在不同的键盘之间进行切换,这个键盘模板文件会有一个按钮。在viewDidLoad方法中放入一个新的方法,命名为addNextKeyboardButton。
func addNextKeyboardButton() {
self.nextKeyboardButton = UIButton.buttonWithType(.System) as UIButton
...
var nextKeyboardButtonBottomConstraint = NSLayoutConstraint(item: self.nextKeyboardButton, attribute: .Bottom, relatedBy: .Equal, toItem: self.view, attribute: .Bottom, multiplier: 1.0, constant: -10.0)
self.view.addConstraints([nextKeyboardButtonLeftSideConstraint, nextKeyboardButtonBottomConstraint])
}
为了更好的梳理代码的结构,创建一个新的方法名为addKeyboardButtons,然后在viewDidLoad中调用它。虽然这里只有几个按钮,但是在真实项目中,将会有更多的按钮。在addKeyboardButtons中调用addNextKeyboardButton。
class KeyboardViewController: UIInputViewController {
...
override func viewDidLoad() {
super.viewDidLoad()
addKeyboardButtons()
}
func addKeyboardButtons() {
addNextKeyboardButton()
}
...
}
点
现在我们来添加点按钮,创建一个UIButton!类型的dotButton属性。
class KeyboardViewController: UIInputViewController {
var nextKeyboardButton: UIButton!
var dotButton: UIButton!
...
}
增加一个名为addDot的方法。使用系统按钮来初始化名为dotButton的属性。增加一个TouchUpInside事件回调函数。设置一个大字体然后增加圆角,同时增加约束来限制它距离水平中心50个points,垂直居中。这个代码应该和下面nextKeyboardButton部分类似。
func addDot() {
// initialize the button
dotButton = UIButton.buttonWithType(.System) as UIButton
dotButton.setTitle(".", forState: .Normal)
dotButton.sizeToFit()
dotButton.setTranslatesAutoresizingMaskIntoConstraints(false)
// adding a callback
dotButton.addTarget(self, action: "didTapDot", forControlEvents: .TouchUpInside)
// make the font bigger
dotButton.titleLabel.font = UIFont.systemFontOfSize(32)
// add rounded corners
dotButton.backgroundColor = UIColor(white: 0.9, alpha: 1)
dotButton.layer.cornerRadius = 5
view.addSubview(dotButton)
// makes the vertical centers equa;
var dotCenterYConstraint = NSLayoutConstraint(item: dotButton, attribute: .CenterY, relatedBy: .Equal, toItem: view, attribute: .CenterY, multiplier: 1.0, constant: 0)
// set the button 50 points to the left (-) of the horizontal center
var dotCenterXConstraint = NSLayoutConstraint(item: dotButton, attribute: .CenterX, relatedBy: .Equal, toItem: view, attribute: .CenterX, multiplier: 1.0, constant: -50)
view.addConstraints([dotCenterXConstraint, dotCenterYConstraint])
}
通过使用textDocumentProxy来实现dotButton回调函数。
func didTapDot() {
var proxy = textDocumentProxy as UITextDocumentProxy
proxy.insertText(".")
}
在addKeyboardButtons中调用addDot方法。
func addKeyboardButtons() {
addDot()
addNextKeyboardButton()
}
接下来对于dash,delete和hideKeyboard,这个过程都比较类似。这个deleteButton会从proxy使用deleteBackward方法,然后hideKeyboardButton会通过KeyboardViewController使用dismissKeyboard方法。
划
与dash相关的代码几乎和dotButton代码一致。为了将dashButton按钮在水平方向与 点 按钮对称,只要将水平约束中的常量改变一下符号即可。
func addDash() {
...
// set the button 50 points to the left (-) of the horizontal center
var dotCenterXConstraint = NSLayoutConstraint(item: dotButton, attribute: .CenterX, relatedBy: .Equal, toItem: view, attribute: .CenterX, multiplier: 1.0, constant: -50)
view.addConstraints([dashCenterXConstraint, dashCenterYConstraint])
}
func didTapDash() {
var proxy = textDocumentProxy as UITextDocumentProxy
proxy.insertText("_")
}
回删
当被按下时,这个删除按钮会通过textDocumentProxy,使用deleteBackword删除字符。这个布局约束会和nextKeyboardButton对称(.Left -> .Right, .Bottom->.Top)
func addDelete() {
deleteButton = UIButton.buttonWithType(.System) as UIButton
deleteButton.setTitle(" Delete ", forState: .Normal)
deleteButton.sizeToFit()
deleteButton.setTranslatesAutoresizingMaskIntoConstraints(false)
deleteButton.addTarget(self, action: "didTapDelete", forControlEvents: .TouchUpInside)
deleteButton.backgroundColor = UIColor(white: 0.9, alpha: 1)
deleteButton.layer.cornerRadius = 5
view.addSubview(deleteButton)
var rightSideConstraint = NSLayoutConstraint(item: deleteButton, attribute: .Right, relatedBy: .Equal, toItem: view, attribute: .Right, multiplier: 1.0, constant: -10.0)
var topConstraint = NSLayoutConstraint(item: deleteButton, attribute: .Top, relatedBy: .Equal, toItem: view, attribute: .Top, multiplier: 1.0, constant: +10.0)
view.addConstraints([rightSideConstraint, topConstraint])
}
func didTapDelete() {
var proxy = textDocumentProxy as UITextDocumentProxy
proxy.deleteBackward()
}
隐藏键盘
当被按下时,这个hideKeyboardButton会在KeyboardViewController上调用dismissKeyboard。
func addHideKeyboardButton() {
hideKeyboardButton = UIButton.buttonWithType(.System) as UIButton
hideKeyboardButton.setTitle("Hide Keyboard", forState: .Normal)
hideKeyboardButton.sizeToFit()
hideKeyboardButton.setTranslatesAutoresizingMaskIntoConstraints(false)
hideKeyboardButton.addTarget(self, action: "dismissKeyboard", forControlEvents: .TouchUpInside)
view.addSubview(hideKeyboardButton)
var rightSideConstraint = NSLayoutConstraint(item: hideKeyboardButton, attribute: .Right, relatedBy: .Equal, toItem: view, attribute: .Right, multiplier: 1.0, constant: -10.0)
var bottomConstraint = NSLayoutConstraint(item: hideKeyboardButton, attribute: .Bottom, relatedBy: .Equal, toItem: view, attribute: .Bottom, multiplier: 1.0, constant: -10.0)
view.addConstraints([rightSideConstraint, bottomConstraint])
}
使用Nib文件
如果写约束并非你擅长的方式,你可以创建一个界面文件,然后将它添加到你的inputView。
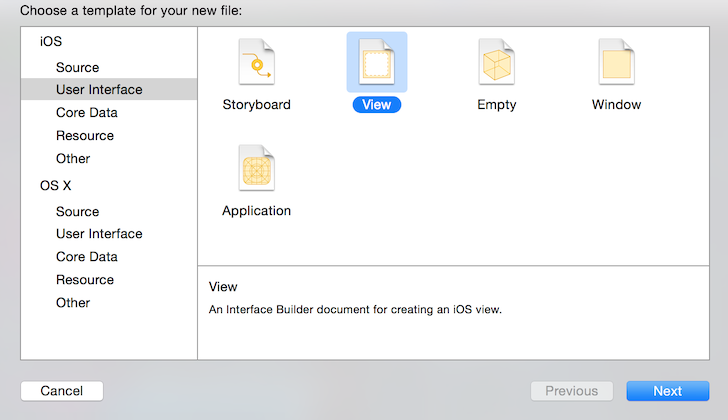
创建一个界面文件
右击MorseCodeKeyboard文件组,然后选择创建新文件。
选择User Interface,然后View Template,命名为CustomKeyboardInterface。
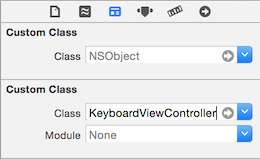
选择File’s Owner,然后在Identity Inspector标签下,将类的名字改为KeyboardViewController。
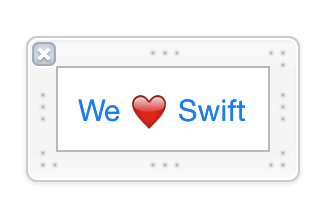
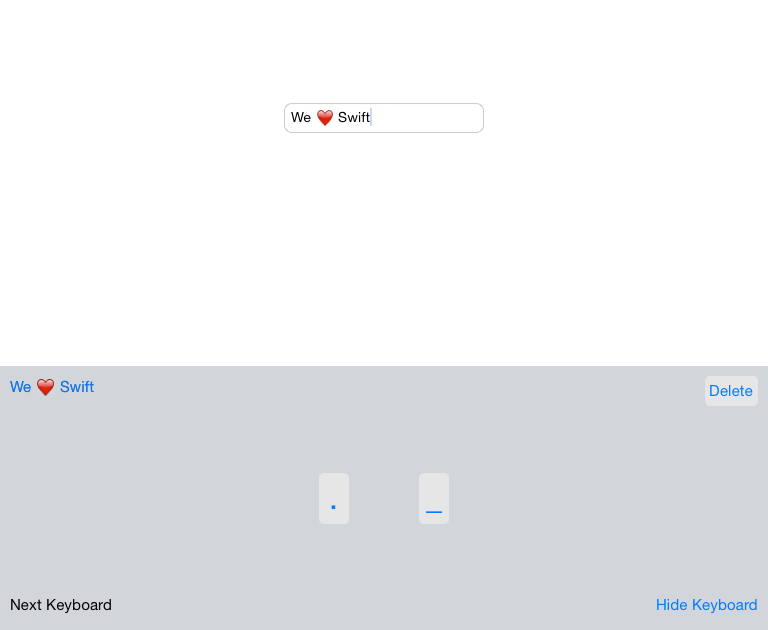
在视图中加入一个按钮,然后将Title设置为We ❤ Swift。这个界面应该和这个有点相似:
加载界面
在init(nibName, bundle)构造函数内,加载这个CustomKeyboard文件,然后保存一个对于这个界面的引用。
class KeyboardViewController: UIInputViewController {
...
var customInterface: UIView!
init(nibName nibNameOrNil: String?, bundle nibBundleOrNil: NSBundle?) {
super.init(nibName: nibNameOrNil, bundle: nibBundleOrNil)
var nib = UINib(nibName: "CustomKeyBoardInterface", bundle: nil)
let objects = nib.instantiateWithOwner(self, options: nil)
customInterface = objects[0] as UIView
}
...
}
将它添加到inputView
在viewDidLoad方法中,将这个自定义界面添加到inputView。
class KeyboardViewController: UIInputViewController {
...
override func viewDidLoad() {
super.viewDidLoad()
view.addSubview(customInterface)
...
}
...
}
为按钮添加回调函数
class KeyboardViewController: UIInputViewController {
...
@IBAction func didTapWeheartSwift() {
var proxy = textDocumentProxy as UITextDocumentProxy
proxy.insertText("We ❤ Swift")
}
...
}
将按钮事件绑定到回调函数
在按钮上右击,然后单击并拖拽touchUpInse事件到didTapWeHeartSwift IBAction。
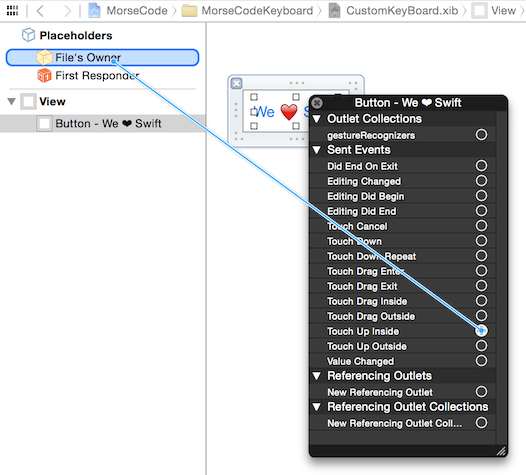
最后,这个代码应该和这个差不多。
在你的设备上安装应用
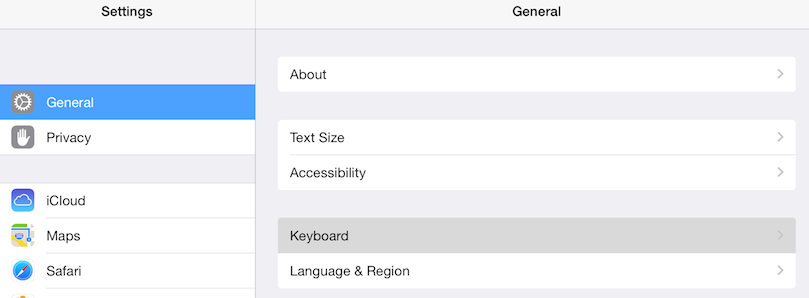
在设备上运行你的项目。他会增加一个自定义键盘在你的设备上,但是在你使用它之前,你必须安装它。
进入设置>通用。选择键盘-应该在选项的底部。
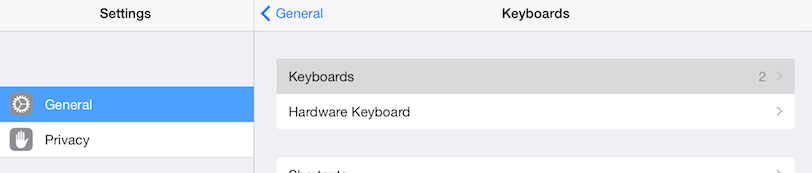
选择键盘。
选择增加新键盘。然后你会看到MorseCode的键盘,选择然后安装这个键盘。
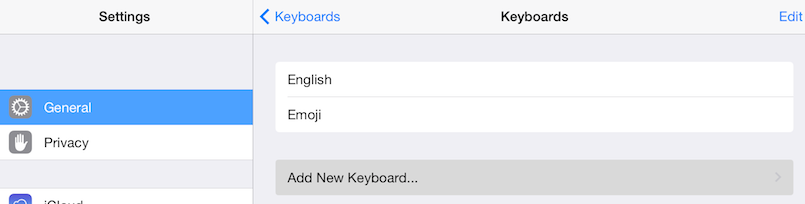
现在我们可以再次运行这个应用,然后使用你的键盘了。
更多的挑战
- 阅读来自Apple的App Extensions Programming Guide指南。
- 为你的喜欢的IM软件创建一个表情输入法。
- 为写代码专用的输入法。
- 让你的摩斯码输入法将你的输入转换为字符和数字。
- 一个包含计算器的输入法。