Rackspace Cloud
发布于 2015-09-14 15:12:22 | 126 次阅读 | 评论: 0 | 来源: 网络整理
This guide is intended to provide instructions on getting started with MongoDB using Rackspace Cloud Servers.
First we’ll step through deployment planning (instance sizes, topology, security) and then we’ll set up a single MongoDB node. We’ll use the same steps to create a multi-node replica set and cover the steps needed to backup your database.
Deployment Planning
Instance Sizes
Rackspace Cloud offers instances with RAM ranging from 256 MB up to 64 GB. When considering instances for initial development purposes, those with 256 or 512 MB are an appropriate starting point. As development progresses towards production-level deployments we recommend moving to higher memory instances. The top-end Cloud instances are appropriate for pre-production and some production deployments. If you need to grow your deployment beyond the Cloud instances, Rackspace also offers managed dedicated servers that can be scaled to increase database performance and throughput.
When planning your deployment, it’s important to account for your resource needs for today and into the future. If you plan on growing your production systems into Rackspace’s dedicated services then it may be useful to consider using RackConnect. This is a service that bridges Rackspace’s public cloud infrastructure with their private dedicated servers. It makes migrating from Cloud to dedicated much easier and is also useful when creating a hybrid deployment solution combining resources from both. For more information refer to Rackspace’s RackConnect site.
Topology
The following are example deployment scenarios for MongoDB built on Rackspace servers.
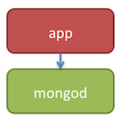
The single node example is the simplest; a single MongoDB instance can be deployed in Rackspace Cloud or Managed hosting. This deployment is useful for development and early app testing.
For production-level deployments, we’ll move to a three node Replica Set running in Rackspace Cloud.

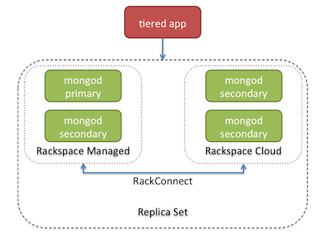
Depending on the size of your database deployment or if your app requires greater levels of database performance, another option is a hybrid deployment. In this case, a Replica Set which spans Rackspace Cloud and Managed hosting can be deployed. Cloud and Managed hosting are “connected” via RackConnect, providing a faster interconnect between the two hosting services.
Security
When deploying onto Rackspace Cloud, you’ll need to secure access to your instances so that MongoDB is only available to known safe systems. To secure your instances we’ll use the iptables command-line tool to control access to the system with a firewall. Once we’ve completed securing our instance, it will be using the following firewall configuration:
port 22 (SSH) will accept any incoming TCP connections
All other ports will reject incoming TCP connections
Later on when we deploy multiple instances we’ll open up port 27017 (for mongod) to other specific IP addresses in order to facilitate a working replica set. The ports required for sharding (27018 and 27019) aren’t required immediately since we’ll be setting up a single node and replica set however just remember to open them up later if necessary.
Monitoring
Monitoring is a critical component of all database servers. MongoDB includes several tools to help gather statistics about data sizes, index sizes and analyze queries. In addition, there are several third-party tools that exist to help integrate MongoDB information into other monitoring solutions. 10gen also offers MongoDB Monitoring Service, a free hosted SaaS monitoring solution that provides custom dashboards and reporting for your MongoDB instances. For more information, refer to Monitoring and Diagnostics.
Deploy a Single Node
Create an Instance
Log in to the Rackspace Cloud control panel and navigate to Hosting > Cloud Servers > Add Server. In this example we used Ubuntu 11.10 (Oneiric Ocelot) as the OS image for our instance. Once selected, enter a server name, select a server size and continue. Be sure to record your root password or you’ll have to reset it later. Once the instance is available, connect to it via SSH to secure it. By default, you’ll be connecting to the server as root. If you’d like to create additional users/groups to use with your instance, consult the documentation for the chosen OS. For our configuration, we used the admin group and added an additional user, per the Ubuntu 11.10 server guide.
First we added a new user (admin) to the admin group:
root# adduser admin --ingroup admin
After stepping through the prompts to set a password (and other account information), the admin user will be created and added to the admin group.
At this point, log out of the server as root and login as admin.
Secure Your Instance
As discussed above in Security, we’ll use a simple firewall setup to secure access to the instances running MongoDB. The built-in ufw command provides a simple mechanism to configure the system firewall. First off, enable the firewall and add a rule to allow SSH access:
sudo ufw enable
sudo ufw allow 22
Now the only port that will allow connections is port 22, attempts to connect on any other port will be dropped. With this firewall setup, the instance is secure and we can proceed with configuring MongoDB. For more information, refer to the Rackspace Introduction to IPTables and the Ubuntu firewall guide.
Install MongoDB
Using the instructions from the MongoDB documentation on Ubuntu and Debian packages we added an additional apt-get source and installed DB.
First add the 10gen GPG key to apt-get to create a “trusted” source:
sudo apt-key adv --keyserver keyserver.ubuntu.com --recv 7F0CEB10
Next, add the following line to /etc/apt/sources.list:
sudo nano /etc/apt/sources.list
...
deb http://downloads-distro.mongodb.org/repo/ubuntu-upstart dist 10gen
...
Now update apt-get to pick up the new packages:
sudo apt-get update
Finally, install MongoDB:
sudo apt-get install mongodb-10gen
At this point MongoDB will be installed and started, which we can confirm via the service utility:
sudo service mongodb status
mongodb start/running, process 2308
You can also check the status by using tail to examine the MongoDB log:
sudo tail -f /var/log/mongodb/mongodb.log
Configure MongoDB
By default, MongoDB is set to use /var/lib/mongodb as the data path. If you’d like to amend that, or update the log path, shutdown the MongoDB instance and update /etc/mongodb.conf with any changes.
If you change the MongoDB dbpath or logpath, be sure to set the proper ownership, etc. For example, to change MongoDB to use /data as the data path, use the following steps.
First, shutdown the MongoDB service:
sudo service mongodb stop
Next, update the MongoDB configuration file:
sudo nano /etc/mongodb.conf
...
dbpath=/data
...
Now create the /data directory and update it’s ownership:
sudo mkdir /data
sudo chown mongodb:mongodb /data
Restart MongoDB with
sudo service mongodb start
Replica Sets
MongoDB Replica Sets are a form of asynchronous data replication between primary/secondary instances of MongoDB, adding automatic failover and automatic recovery of secondary nodes. In addition, Replica Sets can also provide the ability to distribute the read workload of your data.
To create a Replica Set, first create three instances of MongoDB. Next install and configure MongoDB on each instance. (See /tutorial/deploy-replica-set.) Just before starting MongoDB, edit the /etc/mongodb.conf configuration file, adding the replSet parameter:
sudo nano /etc/mongodb.conf
...
replSet=replicaSetName
...
Before proceeding, note that our current security setup has blocked access to all incoming ports (other than port 22 for SSH) therefore the MongoDB instances won’t be accessible. We’ll need to add rule to each instance that allows access to port 27017 (the standard mongod port) from the other instances in our replica set.
Collect the IP addresses of the instances in your Replica Set and execute the following ufw commands on each instance:
sudo ufw allow proto tcp from [IP Address 1] to any port 27017
sudo ufw allow proto tcp from [IP Address 2] to any port 27017
sudo ufw allow proto tcp from [IP Address 3] to any port 27017
Then start MongoDB with
sudo service mongodb start
Once MongoDB has started and is running on each instance we’ll connect to the desired primary node, initialize the Replica Set and add the secondary nodes. First connect to the desired primary node and launch the mongo shell:
mongo
MongoDB shell version: 2.0.4
connecting to: test
Now initialize the Replica Set:
rs.initiate()
{
   "info2" : "no configuration explicitly specified -- making one",
   "me" : "67.207.133.237:27017",
   "info" : "Config now saved locally. Should come online in about a minute.",
   "ok" : 1
}
Next add the other nodes to the Replica Set. If you’re executing this on the first configured instance, add the other 2 instances here:
rs.add("[IP Address 2]");
{ "ok" : 1 }
rs.add("[IP Address 3]");
{ "ok" : 1 }
Finally, you can check the status of the Replica Set from the mongo shell with the following:
rs.status()
In the output of the rs.status() command, you should see three entries, one for each instance. Each one should provide information about it’s current status within the Replica Set. For more information, see MongoDB Replica Sets.
Backups
To facilitate backups there are two main options: Cloud Servers images or MongoDB built-in backup tools.
Cloud Servers Images
Cloud Servers images are snapshots of an entire instance which are saved in Rackspace Cloud Files. Images can be created from any running instance and the process can be completed via the Rackspace Cloud control panel. When creating backups from instances in a Replica Set, be sure to image a SECONDARY instance to avoid any interruptions for your applications or data. To image a SECONDARY, first lock it against database writes from within the Replica Set, create the image and then unlock it to rejoin the Replica Set.
To lock the SECONDARY database, connect with the mongo shell and use the following command:
SECONDARY> db.fsyncLock()
{
   "info" : "now locked against writes, use db.fsyncUnlock() to unlock",
   "seeAlso" : "http://docs.mongodb.org/manual/reference/command/fsync/",
   "ok" : 1
}
While the database is locked it will not accept any incoming writes from the PRIMARY instance. Once locked, go to the Rackspace Cloud control panel and create a “New On-Demand Image”. Once the image has been created and is complete, go back to the mongo shell and issue the “unlock” command:
SECONDARY> db.fsyncUnlock()
{ "ok" : 1, "info" : "unlock completed" }
Once unlocked, any data that was written to the PRIMARY while the SECONDARY was locked will asynchronously replicate to the newly unlocked SECONDARY.
Built-in Tools
MongoDB ships with several built-in command line tools to help with database administration. One of those tools mongodump can be used to create file-based backups of the running database. Mongodump can be used on a live database instance however for the sake of data consistency, it is wise to use the --oplog option when calling mongodump. This allows for point-in-time backups that catch any data that was written while mongodump was working. For more information about live data backups, see the mongodump documentation.