Munin Configuration Examples
发布于 2015-09-14 15:17:44 | 202 次阅读 | 评论: 0 | 来源: 网络整理
Munin can use be used for monitoring aspects of a running system. This page describes how to set up and use the MongoDB plugin with Munin.
Munin is made up of two components:
- The agent and plugins that are installed on the system you want to monitor
- The server, which polls the agents and creates the basic web pages and graphs to visualize the data
Install
You can download from SourceForge, but prebuilt packages are also available. For example on Ubuntu you can install the agent and server as follows:
To install the agent, issue following on each node you want to monitor.
shell> sudo apt-get install munin-node
To install the server on Ubuntu, you must have Apache2 . Issue the following commands:
shell> apt-get install apache2
shell> apt-get install munin
Configuration
You must configure the agents and server with the IP address and port needed to contact each other. The following examples use these addresses:
- db1 : 10.202.210.175
- db2 : 10.203.22.38
- munin-server : 10.194.102.70
Agent Configuration
On each node, add an entry as shown in the following example configuration:
For db1:
/etc/munin/munin-node.conf
host_name db1-ec2-174-129-52-161.compute-1.amazonaws.com
allow ^10.194.102.70$
For db2:
/etc/munin/munin-node.conf
host_name db2-ec2-174-129-52-161.compute-1.amazonaws.com
allow ^10.194.102.70$
In the configuration:
- host_name is used by the server and can be whatever you like.
- allow is the IP address of the server, enabling the server to poll the agent.
Server Configuration
For each node that is being monitored add an entry, as shown in the following example configuration:
[db1-ec2-174-129-52-161.compute-1.amazonaws.com]
address 10.202.210.175
use_node_name no

[db2-ec2-184-72-191-169.compute-1.amazonaws.com]
address 10.203.22.38
use_node_name no
In the configuration:
- The name in between the [] must match the name set in the agents munin-node.conf.
- address is the IP address of the node where the agent is running.
- use_node_name determines whether the IP or the name between [] is used to contact the agent.
MongoDB Munin Plugin
A plugin is available that provide metrics for:
- B-Tree stats
- Current connections
- Memory usage
- Database operations (inserts, updates, queries etc.)
The plugin can be installed as follows on each node where MongoDB is running:
shell> wget http://github.com/erh/mongo-munin/tarball/master
shell> tar xvf erh-mongo-munin-*tar.gz
shell> cp erh-mongo-munin-*/mongo_* /etc/munin/plugins/
Check your setup
After installing the plugin and making the configuration changes, force the server to update the information to check that your setup is correct using the following:
shell> sudo -u munin /usr/share/munin/munin-update
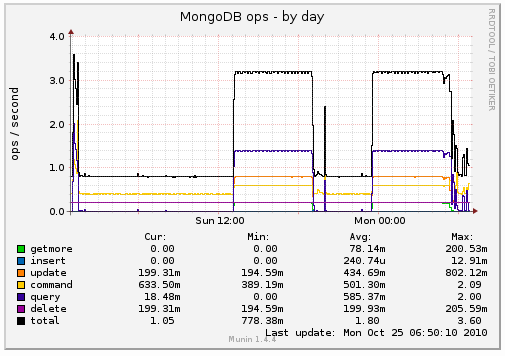
If everything is set up correctly, you will get a chart like this:
Advanced charting
Aggregate Values Across All Nodes
If you are running a large MongoDB cluster, you may want to aggregate the values (e.g. inserts per second) across all the nodes in the cluster. Munin provides a simple way to aggregate. The following example defines a new segment called CLUSTER:
/etc/munin/munin.conf
[compute-1.amazonaws.com;CLUSTER]
update no
In the example:
- update no means Munin can generate the chart based on existing data. This tells Munin not to poll the agents for the data
Aggregate Inserts, Updates, and Deletes
The following example defines a chart to aggregate the inserts, updates, and deletes for the cluster:
cluster_ops.graph_title Cluster Ops
cluster_ops.graph_category mongodb
cluster_ops.graph_total total
cluster_ops.total.graph no
cluster_ops.graph_order insert update delete
cluster_ops.insert.label insert
cluster_ops.insert.sum
  db1-ec2-174-129-52-161.compute-1.amazonaws.com:mongo_ops.insert
  db2-ec2-184-72-191-169.compute-1.amazonaws.com:mongo_ops.insert
cluster_ops.update.label update
cluster_ops.update.sum
  db1-ec2-174-129-52-161.compute-1.amazonaws.com:mongo_ops.update
  db2-ec2-184-72-191-169.compute-1.amazonaws.com:mongo_ops.update
cluster_ops.delete.label delete
cluster_ops.delete.sum
  db1-ec2-174-129-52-161.compute-1.amazonaws.com:mongo_ops.delete
  db2-ec2-184-72-191-169.compute-1.amazonaws.com:mongo_ops.delete
In the example:
cluster_ops: name of this chart.
cluster_ops.graph_category mongodb: puts this chart into the mongodb category. Allows you to collect similar charts on a single page.
cluster_ops.graph_order insert update delete: indicates the order of the lines on the key for the chart.
cluster_ops.insert: represents a single line on the chart, in this case the insert.
cluster_ops.insert.sum: indicates the values are summed.
db1-ec2-174-129-52-161.compute-1.amazonaws.com: indicates the node to aggregate.
mongo_ops.insert: indicates the chart (mongo_ops) and the counter (insert) to aggregate.
And this is what it looks like

