玩转Asp.net MVC 的八个扩展点
发布于 2016-03-21 02:54:58 | 147 次阅读 | 评论: 0 | 来源: 分享
ASP.NET
ASP.NET 是.NET FrameWork的一部分,是一项微软公司的技术,是一种使嵌入网页中的脚本可由因特网服务器执行的服务器端脚本技术,它可以在通过HTTP请求文档时再在Web服务器上动态创建它们。 指 Active Server Pages(动态服务器页面) ,运行于 IIS(Internet Information Server 服务,是Windows开发的Web服务器)之中的程序 。
MVC模型以低耦合、可重用、可维护性高等众多优点已逐渐代替了WebForm模型。能够灵活使用MVC提供的扩展点可以达到事半功倍的效果,另一方面Asp.net MVC优秀的设计和高质量的代码也值得我们去阅读和学习。
本文将介绍Asp.net MVC中常用的八个扩展点并举例说明。
一、ActionResult
ActionResult代表了每个Action的返回结果。asp.net mvc提供了众多内置的ActionResult类型,如:ContentResult,ViewResult,JsonResult等,每一种类型都代表了一种服务端的Response类型。我们什么时候需要使用这个扩展点呢?
假如客户端需要得到XML格式的数据列表:
        public void GetUser()
        {
            var user = new UserViewModel()
            {
                Name = "richie",
                Age = 20,
                Email = "abc@126.com",
                Phone = "139********",
                Address = "my address"
            };
            XmlSerializer serializer = new XmlSerializer(typeof(UserViewModel));
            Response.ContentType = "text/xml";
            serializer.Serialize(Response.Output, user);
        }
我们可以在Controller中定义一个这样的方法,但是这个方法定义在Controller中有一点别扭,在MVC中每个Action通常都需要返回ActionResult类型,其次XML序列化这段代码完全可以重用。经过分析我们可以自定义一个XmlResult类型:
    public class XmlResult : ActionResult
    {
        private object _data;

        public XmlResult(object data)
        {
            _data = data;
        }

        public override void ExecuteResult(ControllerContext context)
        {
            var serializer = new XmlSerializer(_data.GetType());
            var response = context.HttpContext.Response;
            response.ContentType = "text/xml";
            serializer.Serialize(response.Output, _data);
        }
    }
这时候Action就可以返回这种类型了:
        public XmlResult GetUser()
        {
            var user = new UserViewModel()
            {
                Name = "richie",
                Age = 20,
                Email = "abc@126.com",
                Phone = "139********",
                Address = "my address"
            };

            return new XmlResult(user);
        }
同样的道理,你可以定义出其他的ActionResult类型,例如:CsvResult等。
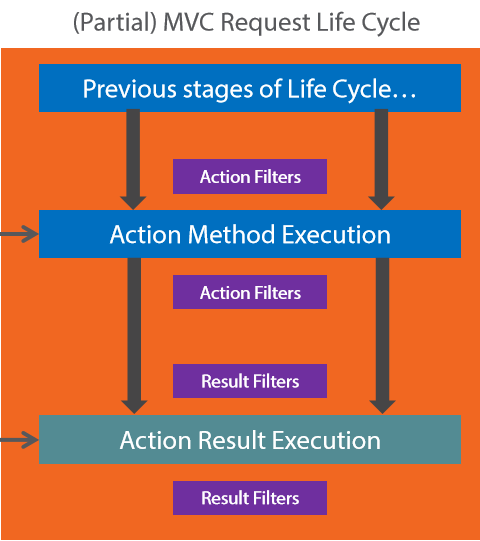
二、Filter
MVC中有四种类型的Filter:IAuthorizationFilter,IActionFilter,IResultFilter,IExceptionFilter
这四个接口有点拦截器的意思,例如:当有异常出现时会被IExceptionFilter类型的Filter拦截,当Action在执行前和执行结束会被IActionFilter类型的Filter拦截。
通过实现IExceptionFilter我们可以自定义一个用来记录日志的Log4NetExceptionFilter:
     public class Log4NetExceptionFilter : IExceptionFilter
    {
        private readonly ILog _logger;

        public Log4NetExceptionFilter()
        {
            _logger = LogManager.GetLogger(GetType());
        }
        public void OnException(ExceptionContext context)
        {
            _logger.Error("Unhandled exception", context.Exception);
        }
    }
最后需要将自定义的Filter加入MVC的Filter列表中:
    public class FilterConfig
    {
        public static void RegisterGlobalFilters(GlobalFilterCollection filters)
        {
            filters.Add(new Log4NetExceptionFilter());
        }
    }
为了记录Action的执行时间,我们可以在Action执行前计时,Action执行结束后记录log:
    public class StopwatchAttribute : ActionFilterAttribute
    {
        private const string StopwatchKey = "StopwatchFilter.Value";
        private readonly ILog _logger= LogManager.GetLogger(typeof(StopwatchAttribute));

        public override void OnActionExecuting(ActionExecutingContext filterContext)
        {
            filterContext.HttpContext.Items[StopwatchKey] = Stopwatch.StartNew();
        }

        public override void OnActionExecuted(ActionExecutedContext filterContext)
        {
            var stopwatch = (Stopwatch)filterContext.HttpContext.Items[StopwatchKey];
            stopwatch.Stop();

            var log=string.Format("controller:{0},action:{1},execution time:{2}ms",filterContext.ActionDescriptor.ControllerDescriptor.ControllerName,filterContext.ActionDescriptor.ActionName,stopwatch.ElapsedMilliseconds)
            _logger.Info(log);
        }
    }
ActionFilterAttribute是一个抽象类,它不但继承了IActionFilter, IResultFilter等Filter,还继承了FilterAttribute类型,这意味着我们可以将这个自定义的类型当作Attribute来标记到某个Action或者Controller上,同时它还是一个Filter,仍然可以加在MVC的Filter中起到全局拦截的作用。
三、HtmlHelper
在Razor页面中,如果需要写一段公用的用来展示html元素的逻辑,你可以选择使用@helper标记,例如:
@helper ShowProduct(List products, string style)
{

        @foreach (var product in products)
        {
            @product.Name
        }

}
这一段代码有点像一个方法定义,只需要传入一个list类型和字符串就会按照定义的逻辑输出html:
Product list using helper

    @ShowProduct(Model.SportProducts, "list-group-item-info")
    @ShowProduct(Model.BookProducts, "list-group-item-warning")

    @ShowProduct(Model.FoodProducts, "list-group-item-danger")
这样抽取的逻辑只对当前页面有效,如果我们想在不同的页面公用这一逻辑如何做呢?
在Razor中输入@Html即可得到HtmlHelper实例,例如我们可以这样用:@Html.TextBox(“name”)。由此可见我们可以将公用的逻辑扩展在HtmlHelper上:
    public static class HtmlHelperExtensions
    {
        public static ListGroup ListGroup(this HtmlHelper htmlHelper)
        {
            return new ListGroup();
        }
    }

    public class ListGroup
    {
        public MvcHtmlString Info(List data, Func getName)
        {
            return Show(data,getName, "list-group-item-info");
        }

        public MvcHtmlString Warning(List data, Func getName)
        {
            return Show(data,getName, "list-group-item-warning");
        }

        public MvcHtmlString Danger(List data, Func getName)
        {
            return Show(data,getName, "list-group-item-danger");
        }

        public MvcHtmlString Show(List data, Func getName, string style)
        {
            var ulBuilder = new TagBuilder("ul");
            ulBuilder.AddCssClass("list-group");
            foreach (T item in data)
            {
                var liBuilder = new TagBuilder("li");
                liBuilder.AddCssClass("list-group-item");
                liBuilder.AddCssClass(style);
                liBuilder.SetInnerText(getName(item));
                ulBuilder.InnerHtml += liBuilder.ToString();
            }
            return new MvcHtmlString(ulBuilder.ToString());
        }
    }
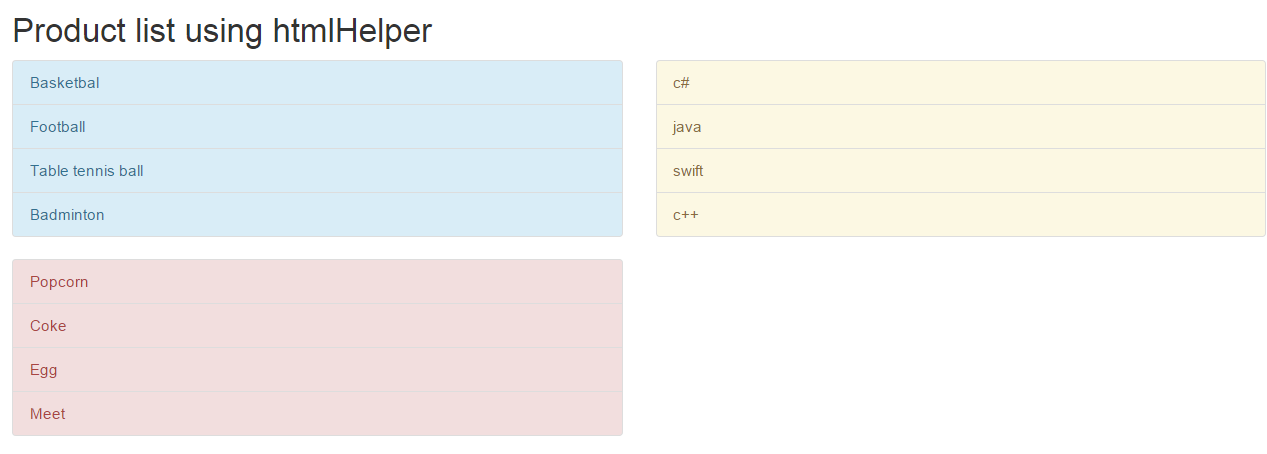
有了上面的扩展,就可以这样使用了:
Product list using htmlHelper

    @Html.ListGroup().Info(Model.SportProducts,x=>x.Name)
    @Html.ListGroup().Warning(Model.BookProducts,x => x.Name)

    @Html.ListGroup().Danger(Model.FoodProducts,x => x.Name)
效果:
四、RazorViewEngine
通过自定义RazorViewEngine可以实现同一份后台代码对应不同风格的View。利用这一扩展能够实现不同的Theme风格切换。再比如站点可能需要在不同的语言环境下切换到不同的风格,也可以通过自定义RazorViewEngine来实现。

下面就让我们来实现一个Theme切换的功能,首先自定义一个ViewEngine:
    public class ThemeViewEngine: RazorViewEngine
    {
        public ThemeViewEngine(string theme)
        {

            ViewLocationFormats = new[]
            {
                "~/Views/Themes/" + theme + "/{1}/{0}.cshtml",
                "~/Views/Themes/" + theme + "/Shared/{0}.cshtml"
            };

            PartialViewLocationFormats = new[]
            {
                "~/Views/Themes/" + theme + "/{1}/{0}.cshtml",
                "~/Views/Themes/" + theme + "/Shared/{0}.cshtml"
            };

            AreaViewLocationFormats = new[]
            {
                "~Areas/{2}/Views/Themes/" + theme + "/{1}/{0}.cshtml",
                "~Areas/{2}/Views/Themes/" + theme + "/Shared/{0}.cshtml"
            };

            AreaPartialViewLocationFormats = new[]
            {
                "~Areas/{2}/Views/Themes/" + theme + "/{1}/{0}.cshtml",
                "~Areas/{2}/Views/Themes/" + theme + "/Shared/{0}.cshtml"
            };
        }
    }
当我们启用这一ViewEngine时,Razor就会在/Views/Themes/文件夹下去找View文件。为了启用自定义的ViewEngine,需要将ThemeViewEngine加入到ViewEngines
public class MvcApplication : System.Web.HttpApplication
    {
        protected void Application_Start()
        {

            if (!string.IsNullOrEmpty(ConfigurationManager.AppSettings["Theme"]))
            {
                var activeTheme = ConfigurationManager.AppSettings["Theme"];
                ViewEngines.Engines.Insert(0, new ThemeViewEngine(activeTheme));
            };

           //...
        }
    }
接下来就开始编写不同风格的View了,重点在于编写的View文件夹组织方式要跟ThemeViewEngine中定义的路径要一致,以ServiceController为例,我们编写ocean和sky两种风格的View:
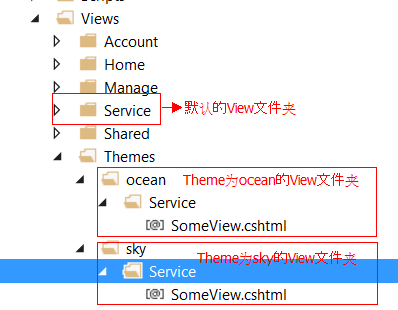
最后在web.config制定一种Theme:,ocean文件夹下的View将会被优先采用:

五、Validator
通过在Model属性上加Attribute的验证方式是MVC提倡的数据验证方式,一方面这种方式使用起来比较简单和通用,另一方面这种统一的方式也使得代码很整洁。使用ValidationAttribute需要引入System.ComponentModel.DataAnnotations命名空间。
但是有时候现有的ValidationAttribute可能会不能满足我们的业务需求,这就需要我们自定义自己的Attribute,例如我们自定义一个AgeValidator:
    public class AgeValidator: ValidationAttribute
    {
        public AgeValidator()
        {
            ErrorMessage = "Please enter the age>18";
        }

        public override bool IsValid(object value)
        {
            if (value == null)
                return false;

            int age;
            if (int.TryParse(value.ToString(), out age))
            {
                if (age > 18)
                    return true;

                return false;
            }

            return false;
        }
    }
自定义的AgeValidator使用起来跟MVC内置的ValiatorAttribute没什么区别:
 [Required]
 [AgeValidator]
 public int? Age { get; set; }
不过我们有时候可能有这种需求:某个验证规则要针对Model中多个属性联合起来判断,所以上面的方案无法满足需求。这时候只需Model实现IValidatableObject接口即可:
     public class UserViewModel:IValidatableObject
{
    public string Name { get; set; }

    [Required]
    [AgeValidator]
    public int? Age { get; set; }

    public IEnumerable Validate(ValidationContext validationContext)
    {
        if(string.IsNullOrEmpty(Name))
            yield return new ValidationResult("the name can not be empty");

        if (Name.Equals("lucy"))
        {
            if(Age.Value<25)
                yield return new ValidationResult("lucy's age must greater than 25");
        }
    }
}
六、ModelBinder
Model的绑定体现在从当前请求提取相应的数据绑定到目标Action方法的参数中。
public ActionResult InputAge(UserViewModel user)
{
//...
return View();
}
对于这样的一个Action,如果是Post请求,MVC会尝试将Form中的值赋值到user参数中,如果是get请求,MVC会尝试将QueryString的值赋值到user参数中。
假如我们跟客户的有一个约定,客户端会POST一个XML格式的数据到服务端,MVC并不能准确认识到这种数据请求,也就不能将客户端的请求数据绑定到Action方法的参数中。所以我们可以实现一个XmlModelBinder:
public class XmlModelBinder:IModelBinder
{
    public object BindModel(ControllerContext controllerContext, ModelBindingContext bindingContext)
    {
        try
        {
            var modelType = bindingContext.ModelType;
            var serializer = new XmlSerializer(modelType);
            var inputStream = controllerContext.HttpContext.Request.InputStream;
            return serializer.Deserialize(inputStream);
        }
        catch
        {
            bindingContext.ModelState.AddModelError("", "The item could not be serialized");
            return null;
        }

    }

}
有了这样的自定义ModelBinder,还需要通过在参数上加Attribute的方式启用这一ModelBinder:
public ActionResult PostXmlContent([ModelBinder(typeof(XmlModelBinder))]UserViewModel user)
{
    return new XmlResult(user);
}
我们使用PostMan发送个请求试试:
刚才我们显示告诉MVC某个Action的参数需要使用XmlModelBinder。我们还可以自定义一个XmlModelBinderProvider,明确告诉MVC什么类型的请求应该使用XmlModelBinder:
public class XmlModelBinderProvider: IModelBinderProvider
{
    public IModelBinder GetBinder(Type modelType)
    {
        var contentType = HttpContext.Current.Request.ContentType.ToLower();
        if (contentType != "text/xml")
        {
            return null;
        }

        return new XmlModelBinder();
    }
}
这一Provider明确告知MVC当客户的请求格式为text/xml时,应该使用XmlModelBinder。
public class MvcApplication : System.Web.HttpApplication
    {
        protected void Application_Start()
        {

            ModelBinderProviders.BinderProviders.Insert(0, new XmlModelBinderProvider());
          //...
        }
有了XmlModelBinderProvier,我们不再显示标记某个Action中的参数应该使用何种ModelBinder:
public ActionResult PostXmlContent(UserViewModel user)
{
    return new XmlResult(user);
}
七、自定义ControllerFactory实现依赖注入
MVC默认的DefaultControllerFactory通过反射的方式创建Controller实例,从而调用Action方法。为了实现依赖注入,我们需要自定义ControllerFactory从而通过IOC容器来创建Controller实例。
以Castle为例,需要定义WindsorControllerFactory,另外还要创建ContainerInstaller文件,将组建注册在容器中,最后通过ControllerBuilder.Current.SetControllerFactory(new WindsorControllerFactory(container));将MVC的ControllerFactory指定为我们自定义的WindsorControllerFactory。
为了简单起见,这一Nuget包可以帮助我们完成这一系列任务:
Install-Package Castle.Windsor.Web.Mvc
上面提到的步骤都会自动完成,新注册一个组件试试:
public class ProvidersInstaller:IWindsorInstaller
    {
        public void Install(IWindsorContainer container, IConfigurationStore store)
        {
            container.Register(Component.For().ImplementedBy().LifestylePerWebRequest());
        }
    }
Controller就可以进行构造器注入了:
private readonly IUserProvider _userProvider;

public ServiceController(IUserProvider userProvider)
{
    _userProvider = userProvider;
}

public ActionResult GetUserByIoc()
{
    var user = _userProvider.GetUser();
    return new XmlResult(user);
}
八、使用Lambda Expression Tree扩展MVC方法
准确来说这并不是MVC提供的扩展点,是我们利用Lambda Expression Tree写出强类型可重构的代码。以ActionLink一个重载为例:
public static MvcHtmlString ActionLink(this HtmlHelper htmlHelper, string linkText, string actionName, object routeValues, object htmlAttributes);
在Razor页面,通过@Html.ActionLink(“Line item 1″, “OrderLineItem”, “Service”, new { id = 1 })可以生成a标签。这一代码的缺点在于Controller和Action都以字符串的方式给出,这样的代码在大型的软件项目中不利于重构,即便Controller和Action字符串编写错误,编译器也能成功编译。
我们可以利用Lambda Expression Tree解析出Controller和Action的名称。理论上所有需要填写Controller和Action字符串的方法都可以通过这一方法来实现。具体实现步骤参考Expression Tree 扩展MVC中的 HtmlHelper 和 UrlHelper。下面给出两种方法的使用对比:
<div class="row">
    <h2>Mvc way</h2>
    <ul>
        <li>@Html.ActionLink("Line item 1", "OrderLineItem", "Service", new { id = 1 }) </li>
        <li>@Html.ActionLink("Line item 2", "OrderLineItem", "Service", new { id = 2 })</li>
        <li>@Url.Action("OrderLineItem","Service",new {id=1})</li>
        <li>@Url.Action("OrderLineItem","Service",new {id=2})</li>
    </ul>
</div>

<div class="row">
    <h2>Lambda Expression tree</h2>
    <ul>
        <li>@Html.ActionLink("Line item 1", (ServiceController c) => c.OrderLineItem(1))</li>
        <li>@Html.ActionLink("Line item 2", (ServiceController c) => c.OrderLineItem(2))</li>
        <li>@Url.Action((ServiceController c)=>c.OrderLineItem(1))</li>
        <li>@Url.Action((ServiceController c)=>c.OrderLineItem(2))</li>
    </ul>
</div>