ASP.NET MVC5网站开发用户登录、注销(五)
发布于 2016-06-30 23:17:33 | 468 次阅读 | 评论: 0 | 来源: 网友投递
ASP.NET
ASP.NET 是.NET FrameWork的一部分,是一项微软公司的技术,是一种使嵌入网页中的脚本可由因特网服务器执行的服务器端脚本技术,它可以在通过HTTP请求文档时再在Web服务器上动态创建它们。 指 Active Server Pages(动态服务器页面) ,运行于 IIS(Internet Information Server 服务,是Windows开发的Web服务器)之中的程序 。
这篇文章主要介绍了ASP.NET MVC5 网站开发中用户登录、注销的实现功能,需要的朋友可以参考下
一、创建ClaimsIdentity
ClaimsIdentity(委托基于声明的标识)是在ASP.NET Identity身份认证系统的登录时要用到,我们在UserService中来生成它。
1、打开IBLL项目InterfaceUserService接口,添加接口方法ClaimsIdentity CreateIdentity(User user, string authenticationType);
2、打开BLL项目的UserService类,添加CreateIdentity方法的实现代码
public ClaimsIdentity CreateIdentity(User user, string authenticationType)
  {
   ClaimsIdentity _identity = new ClaimsIdentity(DefaultAuthenticationTypes.ApplicationCookie);
   _identity.AddClaim(new Claim(ClaimTypes.Name, user.UserName));
   _identity.AddClaim(new Claim(ClaimTypes.NameIdentifier, user.UserID.ToString()));
   _identity.AddClaim(new Claim("http://schemas.microsoft.com/accesscontrolservice/2010/07/claims/identityprovider", "ASP.NET Identity"));
   _identity.AddClaim(new Claim("DisplayName", user.DisplayName));
   return _identity;
  }
二、获取AuthenticationManager(认证管理器)
打开Ninesky.Web项目 Member区域的UserController,添加AuthenticationManager属性,在HttpContext.GetOwinContext()中获取这个属性。
#region 属性
  private IAuthenticationManager AuthenticationManager { get { return HttpContext.GetOwinContext().Authentication; } }
  #endregion
三、创建登录视图模型
Member区域的模型文件夹添加视图模型
using System.ComponentModel.DataAnnotations;

namespace Ninesky.Web.Areas.Member.Models
{
 /// <summary>
 /// 登录模型
 /// <remarks>
 /// 创建:2014.02.16
 /// </remarks>
 /// </summary>
 public class LoginViewModel
 {
  /// <summary>
  /// 用户名
  /// </summary>
  [Required(ErrorMessage = "必填")]
  [StringLength(20, MinimumLength = 4, ErrorMessage = "{2}到{1}个字符")]
  [Display(Name = "用户名")]
  public string UserName { get; set; }

  /// <summary>
  /// 密码
  /// </summary>
  [Required(ErrorMessage = "必填")]
  [Display(Name = "密码")]
  [StringLength(20, MinimumLength = 6, ErrorMessage = "{2}到{1}个字符")]
  [DataType(DataType.Password)]
  public string Password { get; set; }

  /// <summary>
  /// 记住我
  /// </summary>
  [Display(Name = "记住我")]
  public bool RememberMe { get; set; }
 }
}
四、创建登录页面
在UserCcontroller中添加(string returnUrl) action
/// <summary>
  /// 用户登录
  /// </summary>
  /// <param name="returnUrl">返回Url</param>
  /// <returns></returns>
  public ActionResult Login(string returnUrl)
  {
   return View();
  }
右键添加强类型视图,模型为LoginViewModel
@model Ninesky.Web.Areas.Member.Models.LoginViewModel

@{
 ViewBag.Title = "会员登录";
}

@using (Html.BeginForm())
{
 @Html.AntiForgeryToken()

 <div class="form-horizontal">
  <h4>会员登录</h4>
  <hr />
  @Html.ValidationSummary(true)

  <div class="form-group">
   @Html.LabelFor(model => model.UserName, new { @class = "control-label col-md-2" })
   <div class="col-md-10">
    @Html.EditorFor(model => model.UserName)
    @Html.ValidationMessageFor(model => model.UserName)
   </div>
  </div>

  <div class="form-group">
   @Html.LabelFor(model => model.Password, new { @class = "control-label col-md-2" })
   <div class="col-md-10">
    @Html.EditorFor(model => model.Password)
    @Html.ValidationMessageFor(model => model.Password)
   </div>
  </div>

  <div class="form-group">
   @Html.LabelFor(model => model.RememberMe, new { @class = "control-label col-md-2" })
   <div class="col-md-10">
    @Html.EditorFor(model => model.RememberMe)
    @Html.ValidationMessageFor(model => model.RememberMe)
   </div>
  </div>

  <div class="form-group">
   <div class="col-md-offset-2 col-md-10">
    <input type="submit" value="登录" class="btn btn-default" />
   </div>
  </div>
 </div>
}

@section Scripts {
 @Scripts.Render("~/bundles/jqueryval")
}
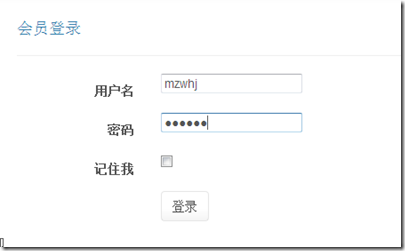
效果
五、创建用户登录处理action
在UserCcontroller中添加 httppost类型的 Login action中先用ModelState.IsValid看模型验证是否通过,没通过直接返回,通过则检查用户密码是否正确。用户名密码正确用CreateIdentity方法创建标识,然后用SignOut方法清空Cookies,然后用SignIn登录。
[ValidateAntiForgeryToken]
  [HttpPost]
  public ActionResult Login(LoginViewModel loginViewModel)
  {
   if(ModelState.IsValid)
   {
    var _user = userService.Find(loginViewModel.UserName);
    if (_user == null) ModelState.AddModelError("UserName", "用户名不存在");
    else if (_user.Password == Common.Security.Sha256(loginViewModel.Password))
    {
     var _identity = userService.CreateIdentity(_user, DefaultAuthenticationTypes.ApplicationCookie);
     AuthenticationManager.SignOut(DefaultAuthenticationTypes.ApplicationCookie);
     AuthenticationManager.SignIn(new AuthenticationProperties() { IsPersistent = loginViewModel.RememberMe }, _identity);
     return RedirectToAction("Index", "Home");
    }
    else ModelState.AddModelError("Password", "密码错误");
   }
   return View();
  }
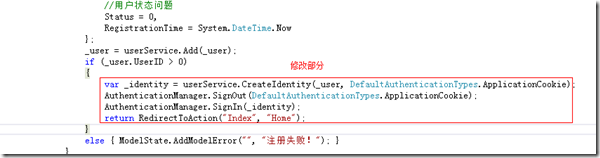
六、修改用户注册代码
让用户注册成功后直接登录
七、注销
在UserCcontroller中添加在Logout action
/// <summary>
  /// 登出
  /// </summary>
  /// <returns></returns>
  public ActionResult Logout()
  {
   AuthenticationManager.SignOut(DefaultAuthenticationTypes.ApplicationCookie);
   return Redirect(Url.Content("~/"));
  }
本文主要是用到了ClaimsIdentity(基于声明的标识)、AuthenticationManager的SignOut、SignIn方法。希望对大家实现用户注册和注销有所帮助。