详解Python操作RabbitMQ服务器消息队列的远程结果返回
发布于 2016-08-02 07:48:53 | 175 次阅读 | 评论: 0 | 来源: 网友投递
这里有新鲜出炉的Python3 官方中文指南,程序狗速度看过来!
Python编程语言
Python 是一种面向对象、解释型计算机程序设计语言,由Guido van Rossum于1989年底发明,第一个公开发行版发行于1991年。Python语法简洁而清晰,具有丰富和强大的类库。它常被昵称为胶水语言,它能够把用其他语言制作的各种模块(尤其是C/C++)很轻松地联结在一起。
RabbitMQ是一款基于MQ的服务器,Python可以通过Pika库来进行程序操控,这里我们将来详解Python操作RabbitMQ服务器消息队列的远程结果返回:
先说一下笔者这里的测试环境:Ubuntu14.04 + Python 2.7.4
RabbitMQ服务器
sudo apt-get install rabbitmq-serverPython使用RabbitMQ需要Pika库
sudo pip install pika
远程结果返回
消息发送端发送消息出去后没有结果返回。如果只是单纯发送消息,当然没有问题了,但是在实际中,常常会需要接收端将收到的消息进行处理之后,返回给发送端。
处理方法描述:发送端在发送信息前,产生一个接收消息的临时队列,该队列用来接收返回的结果。其实在这里接收端、发送端的概念已经比较模糊了,因为发送端也同样要接收消息,接收端同样也要发送消息,所以这里笔者使用另外的示例来演示这一过程。
示例内容:假设有一个控制中心和一个计算节点,控制中心会将一个自然数N发送给计算节点,计算节点将N值加1后,返回给控制中心。这里用center.py模拟控制中心,compute.py模拟计算节点。
compute.py代码分析
#!/usr/bin/env python
#coding=utf8
import pika

#连接rabbitmq服务器
connection = pika.BlockingConnection(pika.ConnectionParameters(
    host='localhost'))
channel = connection.channel()

#定义队列
channel.queue_declare(queue='compute_queue')
print ' [*] Waiting for n'

#将n值加1
def increase(n):
  return n + 1

#定义接收到消息的处理方法
def request(ch, method, properties, body):
  print " [.] increase(%s)" % (body,)

  response = increase(int(body))

  #将计算结果发送回控制中心
  ch.basic_publish(exchange='',
           routing_key=properties.reply_to,
           body=str(response))
  ch.basic_ack(delivery_tag = method.delivery_tag)

channel.basic_qos(prefetch_count=1)
channel.basic_consume(request, queue='compute_queue')

channel.start_consuming()
计算节点的代码比较简单,值得一提的是,原来的接收方法都是直接将消息打印出来,这边进行了加一的计算,并将结果发送回控制中心。
center.py代码分析
#!/usr/bin/env python
#coding=utf8
import pika

class Center(object):
  def __init__(self):
    self.connection = pika.BlockingConnection(pika.ConnectionParameters(
        host='localhost'))

    self.channel = self.connection.channel()

    #定义接收返回消息的队列
    result = self.channel.queue_declare(exclusive=True)
    self.callback_queue = result.method.queue

    self.channel.basic_consume(self.on_response,
                  no_ack=True,
                  queue=self.callback_queue)

  #定义接收到返回消息的处理方法
  def on_response(self, ch, method, props, body):
    self.response = body


  def request(self, n):
    self.response = None
    #发送计算请求,并声明返回队列
    self.channel.basic_publish(exchange='',
                  routing_key='compute_queue',
                  properties=pika.BasicProperties(
                     reply_to = self.callback_queue,
                     ),
                  body=str(n))
    #接收返回的数据
    while self.response is None:
      self.connection.process_data_events()
    return int(self.response)

center = Center()

print " [x] Requesting increase(30)"
response = center.request(30)
print " [.] Got %r" % (response,)
上例代码定义了接收返回数据的队列和处理方法,并且在发送请求的时候将该队列赋值给reply_to,在计算节点代码中就是通过这个参数来获取返回队列的。
打开两个终端,一个运行代码python compute.py,另外一个终端运行center.py,如果执行成功,应该就能看到效果了。
笔者在测试的时候,出了些小问题,就是在center.py发送消息时没有指明返回队列,结果compute.py那边在计算完结果要发回数据时报错,提示routing_key不存在,再次运行也报错。用rabbitmqctl list_queues查看队列,发现compute_queue队列有1条数据,每次重新运行compute.py的时候,都会重新处理这条数据。后来使用/etc/init.d/rabbitmq-server restart重新启动下rabbitmq就ok了。
相互关联编号correlation id
上一遍演示了远程结果返回的示例,但是有一个没有提到,就是correlation id,这个是个什么东东呢?
假设有多个计算节点,控制中心开启多个线程,往这些计算节点发送数字,要求计算结果并返回,但是控制中心只开启了一个队列,所有线程都是从这个队列里获取消息,每个线程如何确定收到的消息就是该线程对应的呢?这个就是correlation id的用处了。correlation翻译成中文就是相互关联,也表达了这个意思。
correlation id运行原理:控制中心发送计算请求时设置correlation id,而后计算节点将计算结果,连同接收到的correlation id一起返回,这样控制中心就能通过correlation id来标识请求。其实correlation id也可以理解为请求的唯一标识码。
示例内容:控制中心开启多个线程,每个线程都发起一次计算请求,通过correlation id,每个线程都能准确收到相应的计算结果。
compute.py代码分析
和上面一篇相比,只需修改一个地方:将计算结果发送回控制中心时,增加参数correlation_id的设定,该参数的值其实是从控制中心发送过来的,这里只是再次发送回去。代码如下:
#!/usr/bin/env python
#coding=utf8
import pika

#连接rabbitmq服务器
connection = pika.BlockingConnection(pika.ConnectionParameters(
    host='localhost'))
channel = connection.channel()

#定义队列
channel.queue_declare(queue='compute_queue')
print ' [*] Waiting for n'

#将n值加1
def increase(n):
  return n + 1

#定义接收到消息的处理方法
def request(ch, method, props, body):
  print " [.] increase(%s)" % (body,)

  response = increase(int(body))

  #将计算结果发送回控制中心,增加correlation_id的设定
  ch.basic_publish(exchange='',
           routing_key=props.reply_to,
           properties=pika.BasicProperties(correlation_id = \
                           props.correlation_id),
           body=str(response))
  ch.basic_ack(delivery_tag = method.delivery_tag)

channel.basic_qos(prefetch_count=1)
channel.basic_consume(request, queue='compute_queue')

channel.start_consuming()
center.py代码分析
控制中心代码稍微复杂些,其中比较关键的有三个地方:
使用python的uuid来产生唯一的correlation_id。
发送计算请求时,设定参数correlation_id。
定义一个字典来保存返回的数据,并且键值为相应线程产生的correlation_id。
代码如下:
#!/usr/bin/env python
#coding=utf8
import pika, threading, uuid

#自定义线程类,继承threading.Thread
class MyThread(threading.Thread):
  def __init__(self, func, num):
    super(MyThread, self).__init__()
    self.func = func
    self.num = num

  def run(self):
    print " [x] Requesting increase(%d)" % self.num
    response = self.func(self.num)
    print " [.] increase(%d)=%d" % (self.num, response)

#控制中心类
class Center(object):
  def __init__(self):
    self.connection = pika.BlockingConnection(pika.ConnectionParameters(
        host='localhost'))

    self.channel = self.connection.channel()

    #定义接收返回消息的队列
    result = self.channel.queue_declare(exclusive=True)
    self.callback_queue = result.method.queue

    self.channel.basic_consume(self.on_response,
                  no_ack=True,
                  queue=self.callback_queue)

    #返回的结果都会存储在该字典里
    self.response = {}

  #定义接收到返回消息的处理方法
  def on_response(self, ch, method, props, body):
    self.response[props.correlation_id] = body

  def request(self, n):
    corr_id = str(uuid.uuid4())
    self.response[corr_id] = None

    #发送计算请求,并设定返回队列和correlation_id
    self.channel.basic_publish(exchange='',
                  routing_key='compute_queue',
                  properties=pika.BasicProperties(
                     reply_to = self.callback_queue,
                     correlation_id = corr_id,
                     ),
                  body=str(n))
    #接收返回的数据
    while self.response[corr_id] is None:
      self.connection.process_data_events()
    return int(self.response[corr_id])

center = Center()
#发起5次计算请求
nums= [10, 20, 30, 40 ,50]
threads = []
for num in nums:
  threads.append(MyThread(center.request, num))
for thread in threads:
  thread.start()
for thread in threads:
  thread.join()
笔者开启了两个终端,来运行compute.py,开启一个终端来运行center.py,最后结果输出截图如下:
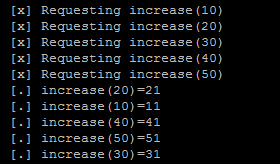
可以看到虽然获取的结果不是顺序输出,但是结果和源数据都是对应的。
这边示例的做法就是创建一个队列,使用correlation id来标识每次请求。也有做法可以不使用correlation id,就是每请求一次,就创建一个临时队列,不过这样太消耗性能了,官方也不推荐这么做。