ASP.NET MVC5网站开发之用户资料的修改和删除3(七)
发布于 2018-03-24 07:26:23 | 511 次阅读 | 评论: 3 | 来源: 网友投递
ASP.NET
ASP.NET 是.NET FrameWork的一部分,是一项微软公司的技术,是一种使嵌入网页中的脚本可由因特网服务器执行的服务器端脚本技术,它可以在通过HTTP请求文档时再在Web服务器上动态创建它们。 指 Active Server Pages(动态服务器页面) ,运行于 IIS(Internet Information Server 服务,是Windows开发的Web服务器)之中的程序 。
这篇文章主要为大家详细介绍了ASP.NET MVC5网站开发之用户资料的修改和删除,感兴趣的小伙伴们可以参考一下
这次主要实现管理后台界面用户资料的修改和删除,修改用户资料和角色是经常用到的功能,但删除用户的情况比较少,为了功能的完整性还是坐上了。主要用到两个action “Modify”和“Delete”。
一、用户资料修改(Modify)
此功能分两个部分:
public ActionResult Modify(int id) 用于显示用户信息
[httppost]
public ActionResult Modify(FormCollection form)用户就收前台传来的信息并修改
1、显示用户信息
/// <summary>
  /// 修改用户信息
  /// </summary>
  /// <param name="id">用户主键</param>
  /// <returns>分部视图</returns>
  public ActionResult Modify(int id)
  {
   //角色列表
   var _roles = new RoleManager().FindList();
   List<SelectListItem> _listItems = new List<SelectListItem>(_roles.Count());
   foreach (var _role in _roles)
   {
    _listItems.Add(new SelectListItem() { Text = _role.Name, Value = _role.RoleID.ToString() });
   }
   ViewBag.Roles = _listItems;
   //角色列表结束
   return PartialView(userManager.Find(id));
  }
此action有一个参数id,接收传入的用户ID,在action中查询角色信息,并利用viewBage传递到视图,并通过return PartialView(userManager.Find(id))向视图传递用户模型返回分部视图。
视图代码如下:
@model Ninesky.Core.User

@using (Html.BeginForm())
{
 @Html.AntiForgeryToken()

 <div class="form-horizontal">
  @Html.ValidationSummary(true, "", new { @class = "text-danger" })
  @Html.HiddenFor(model => model.UserID)

  <div class="form-group">
   @Html.LabelFor(model => model.RoleID, htmlAttributes: new { @class = "control-label col-md-2" })
   <div class="col-md-10">
    @Html.DropDownListFor(model => model.RoleID, (IEnumerable<SelectListItem>)ViewBag.Roles, new { @class = "form-control" })
    @Html.ValidationMessageFor(model => model.RoleID, "", new { @class = "text-danger" })
   </div>
  </div>

  <div class="form-group">
   @Html.LabelFor(model => model.Username, htmlAttributes: new { @class = "control-label col-md-2" })
   <div class="col-md-10">
    @Html.EditorFor(model => model.Username, new { htmlAttributes = new { @class = "form-control", disabled = "disabled" } })
    @Html.ValidationMessageFor(model => model.Username, "", new { @class = "text-danger" })
   </div>
  </div>

  <div class="form-group">
   @Html.LabelFor(model => model.Name, htmlAttributes: new { @class = "control-label col-md-2" })
   <div class="col-md-10">
    @Html.EditorFor(model => model.Name, new { htmlAttributes = new { @class = "form-control" } })
    @Html.ValidationMessageFor(model => model.Name, "", new { @class = "text-danger" })
   </div>
  </div>

  <div class="form-group">
   @Html.LabelFor(model => model.Sex, htmlAttributes: new { @class = "control-label col-md-2" })
   <div class="col-md-10">
    @Html.RadioButtonFor(model => model.Sex, 1) 男
    @Html.RadioButtonFor(model => model.Sex, 0) 女
    @Html.RadioButtonFor(model => model.Sex, 2) 保密
    @Html.ValidationMessageFor(model => model.Sex, "", new { @class = "text-danger" })
   </div>
  </div>

  <div class="form-group">
   @Html.LabelFor(model => model.Password, htmlAttributes: new { @class = "control-label col-md-2" })
   <div class="col-md-10">
    @Html.EditorFor(model => model.Password, new { htmlAttributes = new { @class = "form-control" } })
    @Html.ValidationMessageFor(model => model.Password, "", new { @class = "text-danger" })
   </div>
  </div>

  <div class="form-group">
   @Html.LabelFor(model => model.Email, htmlAttributes: new { @class = "control-label col-md-2" })
   <div class="col-md-10">
    @Html.EditorFor(model => model.Email, new { htmlAttributes = new { @class = "form-control" } })
    @Html.ValidationMessageFor(model => model.Email, "", new { @class = "text-danger" })
   </div>
  </div>

  <div class="form-group">
   @Html.LabelFor(model => model.LastLoginTime, htmlAttributes: new { @class = "control-label col-md-2" })
   <div class="col-md-10">
    @Html.EditorFor(model => model.LastLoginTime, new { htmlAttributes = new { @class = "form-control", disabled = "disabled" } })
    @Html.ValidationMessageFor(model => model.LastLoginTime, "", new { @class = "text-danger" })
   </div>
  </div>

  <div class="form-group">
   @Html.LabelFor(model => model.LastLoginIP, htmlAttributes: new { @class = "control-label col-md-2" })
   <div class="col-md-10">
    @Html.EditorFor(model => model.LastLoginIP, new { htmlAttributes = new { @class = "form-control", disabled = "disabled" } })
    @Html.ValidationMessageFor(model => model.LastLoginIP, "", new { @class = "text-danger" })
   </div>
  </div>

  <div class="form-group">
   @Html.LabelFor(model => model.RegTime, htmlAttributes: new { @class = "control-label col-md-2" })
   <div class="col-md-10">
    @Html.EditorFor(model => model.RegTime, new { htmlAttributes = new { @class = "form-control", disabled = "disabled" } })
    @Html.ValidationMessageFor(model => model.RegTime, "", new { @class = "text-danger" })
   </div>
  </div>

 </div>
}
2、修改用户资料的后台处理
[HttpPost]
  [ValidateAntiForgeryToken]
  public ActionResult Modify(int id,FormCollection form)
  {
   Response _resp = new Auxiliary.Response();
   var _user = userManager.Find(id);
   if (TryUpdateModel(_user, new string[] { "RoleID", "Name", "Sex", "Email" }))
   {
    if (_user == null)
    {
     _resp.Code = 0;
     _resp.Message = "用户不存在,可能已被删除,请刷新后重试";
    }
    else
    {
     if (_user.Password != form["Password"].ToString()) _user.Password = Security.SHA256(form["Password"].ToString());
     _resp = userManager.Update(_user);
    }
   }
   else
   {
    _resp.Code = 0;
    _resp.Message = General.GetModelErrorString(ModelState);
   }
   return Json(_resp);
  }
此方法有两个参数id 和FormCollection form,不用User直接做模型的原因是因为user会把前台所有数据都接收过来,这里我并不想允许修改用户名,所以在方法中使用TryUpdateModel绑定允许用户修改的属性。TryUpdateModel在绑定失败时同样会在在ModelState中记录错误,可以利用自定义方法GetModelErrorString获取到错误信息并反馈给视图。
2、前台显示和处理
打开Index视图找到表格初始化方法,格式化列“Username”使其显示一个连接,代码红线部分。
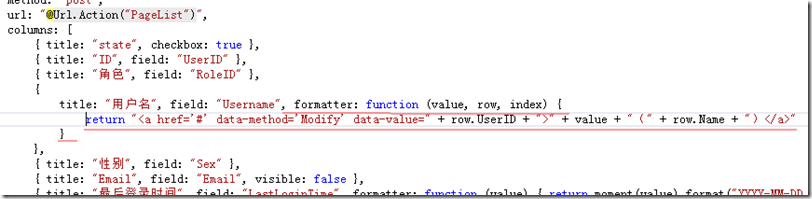
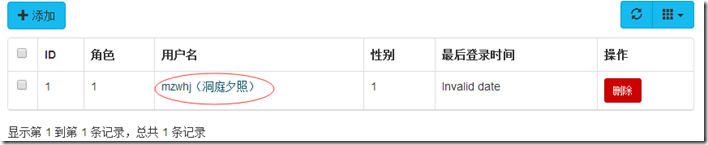
使其看起来这个样子,当用户点击连接的时候可以显示修改对话框
弹出窗口和发送到服务器的js代码写到表格的onLoadSuccess方法里
onLoadSuccess: function () {

     //修改
     $("a[data-method='Modify']").click(function () {
      var id = $(this).attr("data-value");
      var modifyDialog = new BootstrapDialog({
       title: "<span class='glyphicon glyphicon-user'></span>修改用户",
       message: function (dialog) {
        var $message = $('<div></div>');
        var pageToLoad = dialog.getData('pageToLoad');
        $message.load(pageToLoad);

        return $message;
       },
       data: {
        'pageToLoad': '@Url.Action("Modify")/' + id
       },
       buttons: [{
        icon: "glyphicon glyphicon-plus",
        label: "保存",
        action: function (dialogItself) {
         $.post($("form").attr("action"), $("form").serializeArray(), function (data) {
          if (data.Code == 1) {
           BootstrapDialog.show({
            message: data.Message,
            buttons: [{
             icon: "glyphicon glyphicon-ok",
             label: "确定",
             action: function (dialogItself) {
              $table.bootstrapTable("refresh");
              dialogItself.close();
              modifyDialog.close();
             }
            }]

           });
          }
          else BootstrapDialog.alert(data.Message);
         }, "json");
         $("form").validate();
        }
       }, {
        icon: "glyphicon glyphicon-remove",
        label: "关闭",
        action: function (dialogItself) {
         dialogItself.close();
        }
       }]
      });
      modifyDialog.open();
     });
     //修改结束
}
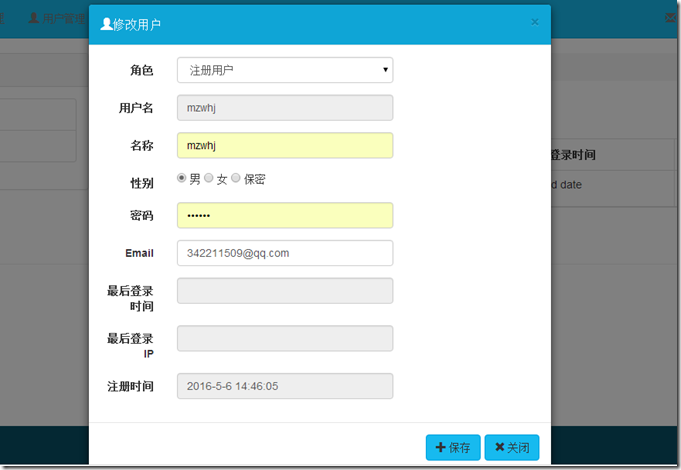
显示效果如下图
二、删除用户
UserController中添加删除方法
/// <summary>
  /// 删除
  /// </summary>
  /// <param name="id">用户ID</param>
  /// <returns></returns>
  [HttpPost]
  public ActionResult Delete(int id)
  {
   return Json(userManager.Delete(id));
  }
打开Index视图找到表格初始化方法,添加“操作”列格式化列使其显示一个删除按钮,代码红框部分。

前台显示效果

然后在表格的onLoadSuccess方法里刚写的修改用户信息的js代码后面写删除用户的js代码
//修改结束

     //删除按钮
     $("a[data-method='Delete']").click(function () {
      var id = $(this).attr("data-value");
      BootstrapDialog.confirm("你确定要删除" + $(this).parent().parent().find("td").eq(3).text() + "吗?\n 建议尽可能不要删除用户。", function (result) {
       if (result) {
        $.post("@Url.Action("Delete", "User")", { id: id }, function (data) {
         if (data.Code == 1) {
          BootstrapDialog.show({
           message: "删除用户成功",
           buttons: [{
            icon: "glyphicon glyphicon-ok",
            label: "确定",
            action: function (dialogItself) {
             $table.bootstrapTable("refresh");
             dialogItself.close();
            }
           }]

          });
         }
         else BootstrapDialog.alert(data.Message);
        }, "json");
       }
      });
     });
     //删除按钮结束
    }
   });
   //表格结束
前台显示效果

==========================================
代码下载请见http://www.cnblogs.com/mzwhj/p/5729848.html
以上就是本文的全部内容,希望对大家的学习有所帮助,也希望大家多多支持PHPERZ。