Install MongoDB on Amazon EC2
发布于 2015-09-14 15:21:43 | 272 次阅读 | 评论: 0 | 来源: 网络整理
This guide provides instructions on setting up production instances of MongoDB across Amazon’s Web Services (AWS) EC2 infrastructure.
First, we’ll step through deployment planning (instance specifications, deployment size, etc.) and then we’ll set up a single production node. We’ll use those setup steps to deploy a three node MongoDB replica set for production use. Finally, we’ll briefly cover some advanced topics such as multi-region availability and data backups.
If you installed MongoDB via the AWS Marketplace this guide can be used to get your instance up and running quickly. Start with the section on Configure Storage to set up a place for your data to be stored. After that refer to the Starting MongoDB section to get your instance started and allow you to get started using MongoDB.
If you’re interested in scaling your deployment, check out the sections on: Deploy a Multi-node Replica Set and Deploy a Sharded Cluster below.
Prerequisites
Generally, there are two ways to work with EC2 - via the command line tools or the AWS Management Console. This guide will use the EC2 command line tools to manage security and storage and launch instances. Use the following steps to setup the EC2 tools on your system:
- Download the EC2 command line tools
- Next, refer to Prerequisites and Setting Up the Tools from Amazon’s Getting Started with the Command Line Tools
Planning Your Deployment
Before starting up your EC2 instances, it’s best to sketch out a few details of the planned deployment. Regardless of the configuration or the number of nodes in your deployment, we’ll configure each one in roughly the same manner.
Instance Specifications
Amazon has several instance choices available ranging from low to high (based on CPU and memory) throughput. Each instance available serves a different purpose and plays a different role when planning your deployment. There are several roles to consider when deploying a MongoDB production cluster. Consider a situation where your deployment contains an even number of replicated data (mongod) instances, an arbiter participates in electing the primary but doesn’t hold any data. Therefore a Small instance may be appropriate for the arbiter role but for data nodes you’ll want to use 64-bit (standard Large or higher) instances, which have greater CPU and memory scaling. For the purposes of this guide we’ll be focused on deploying mongod instances that use the standard Large instance. The AMI (ID: ami-41814f28) is the 64-bit base Amazon Linux, upon which we’ll install MongoDB.
Storage Configuration
For storage we recommend using multiple EBS volumes (as opposed to instance-based storage which is ephemeral) in a RAID-based configuration. Specifically for production deployments you should use RAID 10 across 4-8 EBS volumes for the best performance. When deploying RAID 10, you’ll need enough volume storage to be twice that of the desired available storage for MongoDB. Therefore for 8 GiB of available storage you’ll need to have 16 GiB of allocated storage space across multiple EBS volumes.
Topology
For the purposes of this guide, our topology will be somewhat simple: one to three EC2 instances, each with multiple EBS volumes attached, all located in the same availability zone (and by extension, within the same region). If you are interested in creating a deployment that spans availability zones or regions, it’s best to do that planning up front and take into account security group designations (they cannot span regions) and hostname/DNS access (AWS internal IP addresses can only be used within a zone).
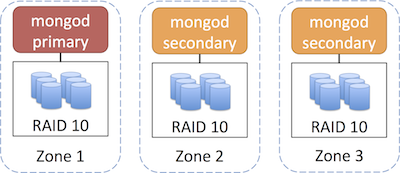
An example 3 node replica set with RAID 10 storage, spanning multiple availability zones would like similar to the following. Availability zones within EC2 are similar to different server racks, therefore it is recommended that you deploy your replica set across multiple zones.
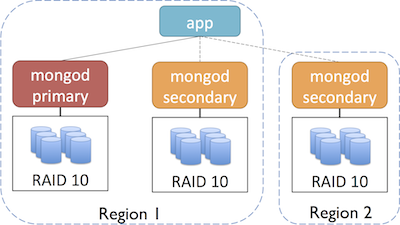
For even greater redundancy and failover, you could also deploy your replica set across multiple regions (and go further with multiple zones in each region):
Refer to the AWS documentation on Using Regions and Availability Zones for more information.
Security
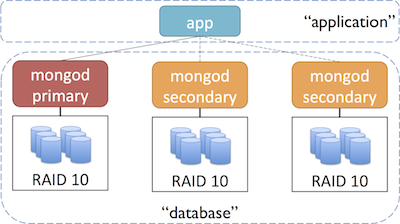
The recommended approach to securing your instances is to use multiple security groups for your MongoDB deployment, one for each type of interaction. For example, you could use one group to manage communication amongst the nodes in your cluster, another group that allows your application to communicate with the database and optionally, a group for tools and maintenance tasks.
An example setup with two security groups might look like this:
Before starting up instances we want to get the security groups created. As previously discussed, we recommend using multiple groups, one for each type of interaction. The following steps will show you how to create two groups (one for your app and another for your database) and provide the authorizations necessary for communication between them.
From the command line, create the database group and authorize SSH:
$ ec2-create-group database --description "security group for database"
GROUP   sg-0814f660 database    security group for database

$ ec2-authorize database -p 22
GROUP           database
PERMISSION      database    ALLOWS  tcp 22  22  FROM    CIDR    0.0.0.0/0   ingress
Authorize communication within the group of MongoDB instances by adding the group to itself. Note you’ll need to provide the user account number (using the -u flag) when authorizing groups:
$ ec2-authorize database -o database -u [AWS_ACCOUNT_NUMBER]
GROUP           database
PERMISSION      database    ALLOWS  tcp 0   65535   FROM    USER    AWS_ACCOUNT_NUMBER  NAME database       ingress
PERMISSION      database    ALLOWS  udp 0   65535   FROM    USER    AWS_ACCOUNT_NUMBER  NAME database       ingress
PERMISSION      database    ALLOWS  icmp    -1  -1  FROM    USER    AWS_ACCOUNT_NUMBER  NAME database       ingress
Optionally, for testing you could also enable the port for the MongoDB web-based status interface (port 28017):
$ ec2-authorize database -p 28017
GROUP           database
PERMISSION      database    ALLOWS  tcp 28017   28017   FROM    CIDR    0.0.0.0/0   ingress
Now create a group that will hold application servers, which will communicate with the database cluster:
$ ec2-create-group application --description "security group for application servers"
GROUP   sg-081bf960 application security group for application servers
Finally, authorize communication from the application servers (group application) to the MongoDB instances (group database):
$ ec2-authorize database -o application -u [AWS_ACCOUNT_NUMBER]
GROUP           database
PERMISSION      database    ALLOWS  tcp 0   65535   FROM    USER    AWS_ACCOUNT_NUMBER  NAME application        ingress
PERMISSION      database    ALLOWS  udp 0   65535   FROM    USER    AWS_ACCOUNT_NUMBER  NAME application        ingress
PERMISSION      database    ALLOWS  icmp    -1  -1  FROM    USER    AWS_ACCOUNT_NUMBER  NAME application        ingress
Refer to the AWS guide Using Security Groups for more information on creating and managing security groups.
The next step is to generate an SSH key-pair that we’ll use to connect to our running EC2 instances. Amazon’s tools provide a mechanism to quickly generate a public-private key pair. Once generated, we’ll need to save the private key so that we can use it to connect via SSH later (click here for more info on key pairs and AWS).
First, generate the key pair:
$ ec2-add-keypair cluster-keypair
KEYPAIR cluster-keypair 05:9b:b3:a6:2e:2f:54:6e:1d:a7:0a:89:56:36:b2:e8:44:37:cf:66
-----BEGIN RSA PRIVATE KEY-----
...
[private key contents]
...
-----END RSA PRIVATE KEY-----
Save the contents of the key to a file (including the BEGIN and END lines) and make sure that file is only readable by you:
$ chmod 600 private-key-file
Optionally, you can also the key to the SSH agent to ease connecting to our instances later:
$ ssh-add private-key-file
We’re finished with the pre-deployment steps; we’ve covered the storage and security considerations that’s necessary to setup and deploy our instances.
Deploy a Single Node
We’ll start our deployment by setting up single node because later on we’ll use the same steps to set up a larger cluster. The first step is to launch the instance and then setup the EBS-backed RAID 10 storage for the instance. Setting up the storage requires creating, attaching, configuring and formatting the volumes where our data will be stored.
注解
If you created a MongoDB instance via the AWS Marketplace, skip ahead to Configure Storage below.
Launch Instance
From the command line we can launch the instance. We’ll need to supply an ID for an Amazon Machine Image (AMI) that we’ll build our node from. We recommend using a 64-bit Amazon Linux AMI as the base of your MongoDB nodes. In this example, we are using ami-e565ba8c with the number of nodes (1), security group (database), authentication keypair (cluster-keypair), type of instance (m1.large) and availability zone (us-east-1a). Depending on the region you deploy into, a different AMI ID may be needed:
$ ec2-run-instances ami-e565ba8c -n 1 -g database -k cluster-keypair -t m1.large -z us-east-1a

RESERVATION r-f57f8094  711489243244    database
INSTANCE    i-a3323dc0  ami-e565ba8c            pending cluster-keypair 0       m1.large    2011-12-06T23:18:18+0000    us-east-1c  aki-825ea7eb            monitoring-disabled                 ebs                 paravirtual xen     sg-0814f660, sg-1e15f776    default
Next, let’s add some tags to the instance so we can identify it later. Tags are just metadata key-value pairs:
$ ec2-create-tags i-11eee072 --tag Name=QuickstartTestNode --tag Owner=Bob

TAG instance    i-11eee072  Name    QuickstartTestNode
TAG instance    i-11eee072  Owner   Bob
Now we can ascertain some status information about running instances at AWS (includes EBS volumes as well):
$ ec2-describe-instances

RESERVATION r-f57f8094  711489243244    database
INSTANCE    i-a3323dc0  ami-e565ba8c    ec2-107-20-68-113.compute-1.amazonaws.com   ip-10-2-182-67.ec2.internal running cluster-keypair 0       m1.large    2011-12-06T23:18:18+0000    us-east-1c  aki-825ea7eb            monitoring-disabled 107.20.68.113   10.2.182.67         ebs                 paravirtual xen     sg-0814f660, sg-1e15f776    default
BLOCKDEVICE /dev/sda1   vol-2348cf4e    2011-12-06T23:18:43.000Z
Configure Storage
Now that the instance is running, let’s create the EBS volumes we’ll use for storing our data. In this guide we’ll set up 4 volumes with 4 GiB of storage each (configured that’s 16 GiB but because we’re using a RAID 10 configuration that will become 8 GiB of available storage).
First off, create the EBS volumes supplying the size (4) and zone (us-east-1a) and save the results into a temporary file that we’ll read from for the next command. Here’s the command we’ll use:
$ for x in {1..4}; do
> ec2-create-volume -s 4 -z us-east-1a;
> done > vols.txt
Here’s the output of that command:
$ more vols.txt
VOLUME  vol-e796108a    4               us-east-1a      creating        2011-12-07T04:37:21+0000
VOLUME  vol-c39610ae    4               us-east-1a      creating        2011-12-07T04:37:30+0000
VOLUME  vol-a19610cc    4               us-east-1a      creating        2011-12-07T04:37:39+0000
VOLUME  vol-b19610dc    4               us-east-1a      creating        2011-12-07T04:37:47+0000
Now, let’s attach those newly created volumes to our previously launched running instance from above. From the command line we’ll start with the temp file (vols.txt), the running instance ID (i-11eee072), and a prefix for each attached device (/dev/sdh):
$ (i=0;
> for vol in $(awk '{print $2}' vols.txt); do
>   i=$((i+1));
>   ec2-attach-volume $vol -i i-11eee072 -d /dev/sdh${i};
> done)
Assuming the volumes attached successfully, you should see something like this:
ATTACHMENT  vol-e796108a    i-11eee072  /dev/sdh1   attaching   2011-12-07T04:48:22+0000
ATTACHMENT  vol-c39610ae    i-11eee072  /dev/sdh2   attaching   2011-12-07T04:48:29+0000
ATTACHMENT  vol-a19610cc    i-11eee072  /dev/sdh3   attaching   2011-12-07T04:48:37+0000
ATTACHMENT  vol-b19610dc    i-11eee072  /dev/sdh4   attaching   2011-12-07T04:48:44+0000
Now we’ll need to connect to the running instance via SSH and configure those attached volumes as a RAID array. If you added the private key to your running SSH agent, you should be able to connect with something like (substituting your instance’s hostname):
$ ssh ec2-user@ec2-a-b-c-d.amazonaws.com
And now create the RAID array using the built-in mdadm program. You’ll need the level (10), number of volumes (4), name of the new device (/dev/md0) and the attached device prefix (/dev/sdh*):
$ sudo mdadm --verbose --create /dev/md0 --level=10 --chunk=256 --raid-devices=4 /dev/sdh1 /dev/sdh2 /dev/sdh3 /dev/sdh4
$ echo 'DEVICE /dev/sdh1 /dev/sdh2 /dev/sdh3 /dev/sdh4' | sudo tee -a /etc/mdadm.conf
$ sudo mdadm --detail --scan | sudo tee -a /etc/mdadm.conf
Once mdadm is done and we’ve persisted the storage configuration, we’ll need to tune the EBS volumes to achieve desired performance levels. This tuning is done by setting the “read-ahead” on each device. For more information refer to the blockdev man page.
$ sudo blockdev --setra 128 /dev/md0
$ sudo blockdev --setra 128 /dev/sdh1
$ sudo blockdev --setra 128 /dev/sdh2
$ sudo blockdev --setra 128 /dev/sdh3
$ sudo blockdev --setra 128 /dev/sdh4
With the RAID10 created we now turn to the Logical Volume Manager (lvm) which we’ll use to create logical volumes for the data, log files and journal for MongoDB. The purpose of using lvm is to (1) safely partition different objects from each other and (2) provide a mechanism that we can use to grow our storage sizes later. First we start by zeroing out our RAID, creating a physical device designation and finally a volume group for that device.
$ sudo dd if=/dev/zero of=/dev/md0 bs=512 count=1
$ sudo pvcreate /dev/md0
$ sudo vgcreate vg0 /dev/md0
Once the volume group has been created, we now create logical volumes for the data, logs and journal. Depending upon the amount of available storage you may want to designate specific sizes vs. volume group percentages (as shown below). We recommend approximately 10GB for log storage and 10GB for journal storage.
$ sudo lvcreate -l 90%vg -n data vg0
$ sudo lvcreate -l 5%vg -n log vg0
$ sudo lvcreate -l 5%vg -n journal vg0
At this point we have three volumes to configure (/dev/vg0/...). For each volume we’ll create a filesystem, mount point and an entry in the filesystem table. In the example below we used the ext4 filesystem however you could instead elect to use xfs, just be sure to edit the mke2fs and sed commands accordingly. The /etc/fstab entries require the partition (e.g. /dev/vg0/data), a mount point for the filesystem (/data), the filesystem type (ext4 or xfs) and the mount parameters (defaults, auto, noatime, noexec, nodiratime 0 0, refer to the mount man page for more information on these parameters:
$ sudo mke2fs -t ext4 -F /dev/vg0/data
$ sudo mke2fs -t ext4 -F /dev/vg0/log
$ sudo mke2fs -t ext4 -F /dev/vg0/journal

$ sudo mkdir /data
$ sudo mkdir /log
$ sudo mkdir /journal

$ echo '/dev/vg0/data /data ext4 defaults,auto,noatime,noexec 0 0' | sudo tee -a /etc/fstab
$ echo '/dev/vg0/log /log ext4 defaults,auto,noatime,noexec 0 0' | sudo tee -a /etc/fstab
$ echo '/dev/vg0/journal /journal ext4 defaults,auto,noatime,noexec 0 0' | sudo tee -a /etc/fstab
Now mount all of the storage devices. By adding the entry to /etc/fstab, we’ve shortened the call to mount because it will look in that file for the extended command parameters.
$ sudo mount /data
$ sudo mount /log
$ sudo mount /journal
With the devices mounted we issue one last call to set the MongoDB journal files to be written to our new journal device, via a symbolic link to the new device:
$ sudo ln -s /journal /data/journal
Install and Configure MongoDB
注解
If you created a MongoDB instance via the AWS Marketplace, skip ahead to [#Starting MongoDB] below.
Now that the storage has been configured, we need to install and configure MongoDB to use the storage we’ve set up, then set it to start up on boot automatically. First, add an entry to the local yum repository for MongoDB:
$ echo "[10gen]
name=10gen Repository
baseurl=http://downloads-distro.mongodb.org/repo/redhat/os/x86_64
gpgcheck=0" | sudo tee -a /etc/yum.repos.d/10gen.repo
Next, install MongoDB and the sysstat diagnostic tools:
$ sudo yum -y install mongo-10gen-server
$ sudo yum -y install sysstat
Set the storage items (data, log, journal) to be owned by the user (mongod) and group (mongod) that MongoDB will be starting under:
$ sudo chown mongod:mongod /data
$ sudo chown mongod:mongod /log
$ sudo chown mongod:mongod /journal
Now edit the MongoDB configuration file and update the following parameters:
$ sudo nano /etc/mongod.conf
...
logpath=/log/mongod.log
logappend=true
fork=true
dbpath=/data
...
Starting MongoDB
Set the MongoDB service to start at boot and activate it:
$ sudo chkconfig mongod on
$ sudo /etc/init.d/mongod start
When starting for the first time, it will take a couple of minutes for MongoDB to start, setup it’s storage and become available. Once it is, you should be able to connect to it from within your instance:
$ mongo
MongoDB shell version: 2.0.4
connecting to: test
>
Just to confirm the system is working correctly, try creating a test database, test collection and save a document:
> use testdb
switched to db testdb
> db.createCollection("testCollection")
{ "ok" : 1 }
> db.testCollection.save({"name":"bob"})
> db.testCollection.find()
{ "_id" : ObjectId("4edfda1c86176ab8e27ee976"), "name" : "bob" }
Now that we’ve got a single node up and running with EBS backed RAID storage, let’s move on and create a multi-node replica set.
Deploy a Multi-node Replica Set
Replica Set Background
Replica sets are a form of asynchronous master/slave replication, adding automatic failover and automatic recovery of member nodes. A replica set consists of two or more nodes that are copies of each other (i.e.: replicas). See Replica Set Fundamentals for more information.
Create and Configure Instances
For this guide, we’ll set up a three node replica set. To set up each node use the instructions from Deploy a Single Node above. Once that’s completed, we’ll update the configurations for each node and get the replica set started.
First we’ll need to edit the MongoDB configuration and update the replSet parameter:
$ sudo nano /etc/mongod.conf
...
replSet=exampleReplicaSetName
...
Save the configuration file and restart mongod:
$ sudo /etc/init.d/mongod restart
Configure Replica Set
Once MongoDB has started and is running on each node, we’ll need to connect to the desired primary node, initiate the replica set and add the other nodes. First connect to the desired primary via SSH and then start mongo to initiate the set:
$ mongo
MongoDB shell version: 2.0.4
connecting to: test
> rs.initiate()
{
    "info2" : "no configuration explicitly specified -- making one",
    "me" : "ip-10-127-127-91:27017",
    "info" : "Config now saved locally.  Should come online in about a minute.",
    "ok" : 1
}
Next, add the other nodes to the replica set:
> rs.add("ec2-107-21-46-145.compute-1.amazonaws.com")
{ "ok" : 1 }
PRIMARY> rs.add("ec2-108-90-58-191.compute-1.amazonaws.com")
{ "ok" : 1 }
PRIMARY>
The 3 node replica set is now configured. You can confirm the setup by checking the health of the replica set:
PRIMARY> rs.status()
{
    "set" : "exampleReplicaSetName",
    "date" : "Tue Dec 06 2011 11:39:08 GMT-0500 (CDT)",
    "myState" : 1,
    "members" : [
        {
            "name" : "ip-10-127-127-91:27017",
            "self" : true,
         },
        {
            "name" : "ec2-107-21-46-145.compute-1.amazonaws.com:27017",
            "health" : 1,
            "uptime" : 101,
            "lastHeartbeat" : "Tue Dec 06 2011 11:39:07 GMT-0500",
         },
        {
            "name" : "ec2-108-90-58-191.compute-1.amazonaws.com:27017",
            "health" : 1,
            "uptime" : 107,
            "lastHeartbeat" : "Tue Dec 06 2011 11:39:07 GMT-0500",
         }
     ],
     "ok" : 1
 }
What we’ve completed here is a simple replica set; there are additional configurations out there that may make more sense for your deployment, refer to the MongoDB documentation for more information. If you intend to use your replica set to help scale read capacity, you’ll also need to update your application’s code and add the appropriate slaveOk=true where necessary so that read results can be returned from additional nodes more quickly.
Deploy a Sharded Cluster
MongoDB scales horizontally via a partitioned data approach known as sharding. MongoDB provides the ability to automatically balance and distribute data across multiple partitions to support write scalability. For more information, refer to the /sharding documentation.
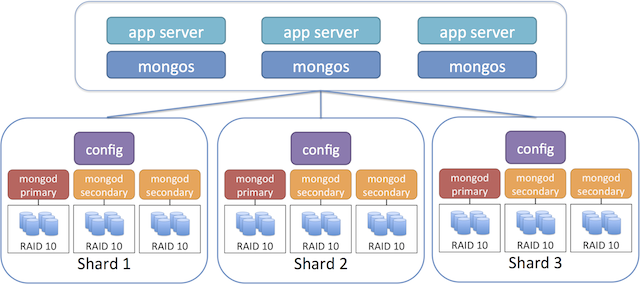
Simple Sharding Architecture
To build our simple sharded configuration, we’ll be building upon the replica set steps we just worked on. To get started you’ll need to create two additional replica set configurations, just the same from above. When configuring each server instance we’ll set the shardsvr parameter inside the mongod configuration file. Next we’ll take one node from each replica set and set it to run as a config server as well. The config server maintains metadata about the sharded data storage cluster. Finally, we’ll add instances for the mongos router, which handles routing requests from your app to the correct shard. The recommended approach is to run this component on your application servers. The following image shows a recommended topology for use with sharding:
Create three nodes for each replica set. Use the following instructions:
Create and Configure Instances. Before saving /etc/mongod.conf, add this parameter:
shardsvr = true
Save the configuration file and restart mongod:
sudo /etc/init.d/mongod restart
Once /etc/mongod.conf has been updated, initiate the replica set and add the members as described in Add Members to a Replica Set. Once that’s complete, choose one instance from each replica set and start an additional mongod process those instances, this time as the config server component:
$ mongod --configsvr
Now that we’ve got N config servers running (where N is the number of running replica sets) we can set up the request router mongos. This process typically runs on your application servers and handles routing database requests from your app to the correct database shard. Assuming you already have your application configured and deployed, use ssh to connect to each instance and install MongoDB using the steps from Install and Configure MongoDB.
Before we continue, it is important to consider the role DNS plays in a sharded cluster setup. Generally we recommend using DNS hostnames for configuring replica sets, which Amazon handles appropriately, as opposed to using specific IP addresses. Essentially, AWS knows the mapping between public and private addresses and hostnames and manages inter-region domain name resolution. Therefore, by using the public DNS name for our servers we can ensure that whether our servers are in a single region or across multiple regions, AWS will correctly route our requests. When it comes to setting up sharding, we recommend an additional step of using DNS aliases for the instances that will be acting as config servers. The routers must know the hostnames of the config servers so by using DNS aliases we gain additional flexibility if config servers ever need to change. All it takes is pointing the DNS alias to another instance and no additional update to the router configuration is needed. For more information on this topic, refer to docs on changing config servers.
Once the DNS settings have taken effect, we can proceed with the mongodb-manual:mongos setup. Go back to the command line on each of the instances you’ll be using for mongodb-manual:mongos and start the service and point it to the instances running the config server using their DNS aliases (ex: alias1.yourdomain.com, alias2.yourdomain.com and alias3.yourdomain.com) along with the config server port `27019:
$ mongos --configdb alias1.yourdomain.com:27019,alias2.yourdomain.com:27019,alias3.yourdomain.com:27019
With the mongodb-manual:mongos routers running, we can now complete the setup for the sharding architecture. The last step is to add the previously created replica sets to the overall system. Choose one of the instances that is running mongodb-manual:mongos, start the mongodb-manual:mongo client using the hostname and port (27017) and connect to the admin database. You’ll need to have the name for each replica set (ex: replicaSetName1) and the hostnames for each member of the set (e.g: replicaSetHost1)
$ mongo host-running-mongos:27017/admin
MongoDB shell version: 2.0.4
connecting to: admin
> db.adminCommand({addShard:"replicaSetName1/replicaSetHost1:27018,replicaSetHost2:27018,replicaSetHost3:27018"})
The addShard command will need to be repeated for each replica set that is part of the sharded setup:
> db.adminCommand({addShard:"replicaSetName2/replicaSetHost4:27018,replicaSetHost5:27018,replicaSetHost6:27018"})
> db.adminCommand({addShard:"replicaSetName3/replicaSetHost7:27018,replicaSetHost8:27018,replicaSetHost9:27018"})
Once these steps have been completed, you’ll have a simple sharded configuration. The architecture we used includes 3 database shards for write scalability and three replicas within each shard for read scalability and failover. This type of setup deployed across multiple regions (ex: one node from each replica located in us-west-1) would also provide some degree of disaster recovery as well.
In order to utilize this newly created configuration, you’ll need to specify which databases and which collections are to be sharded.
For more information, see Deploy a Sharded Cluster.
Backup and Restore
There are several ways to backup your data when using AWS, refer to the EC2 Backup and Restore guide for more information.